Static pages are great for simple websites. But if you want to keep your content fresh and personalized, dynamic web pages are the best choice. Because they automatically update and display content based on user behavior, database entries, or specific conditions.
Dynamic web pages make your website smarter. You can show personalized content to each user based on their interests or behavior. They can also filter and find the exact post/content they are looking for. This makes the browsing experience smoother and keeps people engaged for a longer time.
If you’re using WordPress, creating dynamic pages doesn’t have to be hard. With Elementor, you can design even complex dynamic page layouts and connect them to data without writing any code. In this article, we’ll show you how to create a dynamic web page in WordPress with Elementor.
What Are Dynamic Web Pages?
Dynamic web pages refer to the web pages that can change their content automatically. They show different content depending on the user, time, or data from a database. For example, a news website may display the latest articles, or an online store may show products based on users’ previous searches.
Unlike static pages, you don’t have to edit the content manually every time. Thus, they save time for website owners and give a better experience to visitors. In WordPress, dynamic content can come from blog posts, custom fields, user profiles, or product listings.
Why Use Elementor for Dynamic Web Pages?

Elementor is one of the best tools for building dynamic web pages in WordPress, especially for beginners and non-coders. It gives you full control over your website design while also letting you connect content from your WordPress database. Here are some key reasons to use Elementor for dynamic pages:
a. No Coding Needed
Elementor’s drag-and-drop system is very beginner-friendly. You can design advanced layouts and add dynamic content with just a few clicks.
b. Powerful Dynamic Tags
You can pull content from custom fields, user data, site information, or post data using dynamic tags. This makes your page smart and flexible.
c. Works with Custom Post Type Plugins
Elementor supports plugins like Advanced Custom Fields (ACF), Toolset, and Pods. These plugins let you store extra data, which you can easily display on your pages.
d. Full Design Control
Elementor gives you complete freedom to design how your dynamic content looks. You can use conditions, templates, and display rules to control what content appears and where.
e. Live Preview
You can see the dynamic content live while building the page. This helps you work faster and avoid mistakes. Explore how to design a knowledge base in WordPress.
Prerequisites for Creating a Dynamic Web Page

To design a dynamic web page in WordPress without coding, there are several tools you need. They are essential to store custom data, connect that data to your designs, and display everything in a flexible and dynamic way. Take a look at the tools you need.
Below, we have briefly explained why you need these tools to create dynamic web pages:
Pods Admin – This plugin lets you create custom post types, custom fields, and relationships. Creating a custom post type with the necessary custom fields is the first step of creating a dynamic web page.
Elementor – The core version of Elementor allows you to build beautiful page layouts using a drag-and-drop system. It’s easy to use and perfect for visual design.
Elementor Pro – The premium version adds powerful features like Theme Builder, Dynamic Tags, and custom templates. These are essential for connecting your pages with dynamic content.
HappyAddons – It can extend Elementor’s features by adding more widgets and styling options. It helps you create more attractive layouts with less effort.
HappyAddons Pro – The pro version unlocks advanced widgets and features that support dynamic content. It works well with Elementor Pro, providing more flexibility in designing custom templates.
How to Create a Dynamic Web Page in WordPress (Step by Step)
Creating dynamic web pages involves two phases. First, create a custom post type and add the necessary custom fields using a plugin like Pods. Then, design your custom page using Elementor and connect the dynamic tags to show the data from those custom fields on the front end.
Phase One: Create a Custom Post Type
Before creating a dynamic web page, you need to create a custom post type and add the necessary custom fields. For this, we’ll use the Pods Admin plugin.
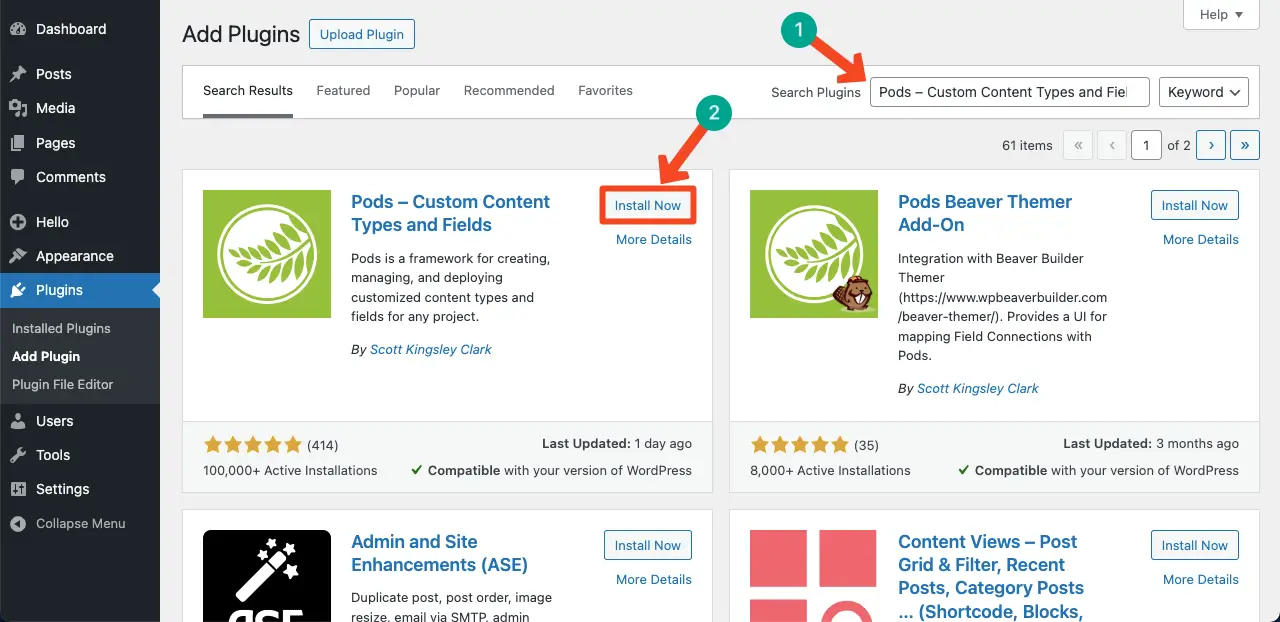
Step 1: Install the Pods Admin Plugin
If you haven’t already installed the Pods – Custom Content Types and Fields plugin, go ahead and do it first. Install and activate it. After that, you’ll be able to create custom post types and fields easily.
Step 2: Create Posts from the Blog Section
Let’s assume we want to create custom posts for 50 engineering firms. Here’s how to add those posts:
From your WordPress dashboard, go to Posts > Add New. Create as many posts as you need for your custom data.
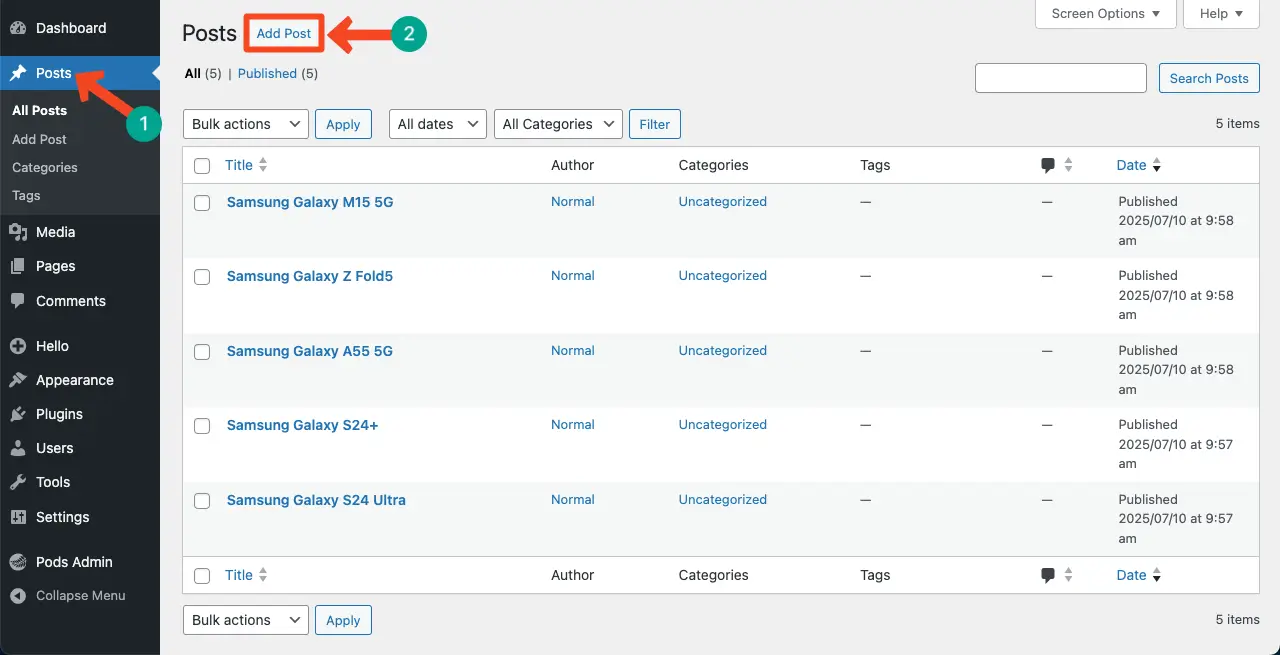
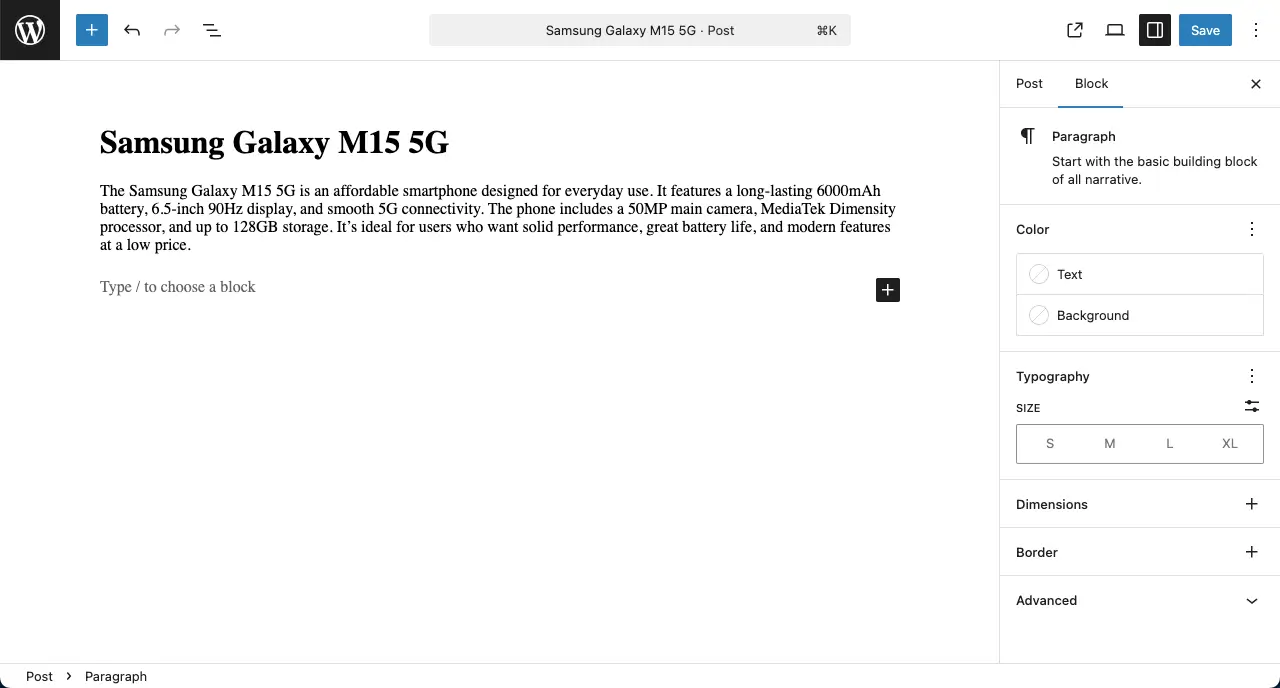
You can write a short description of each company in the content editor. To do this, click Edit under each post.
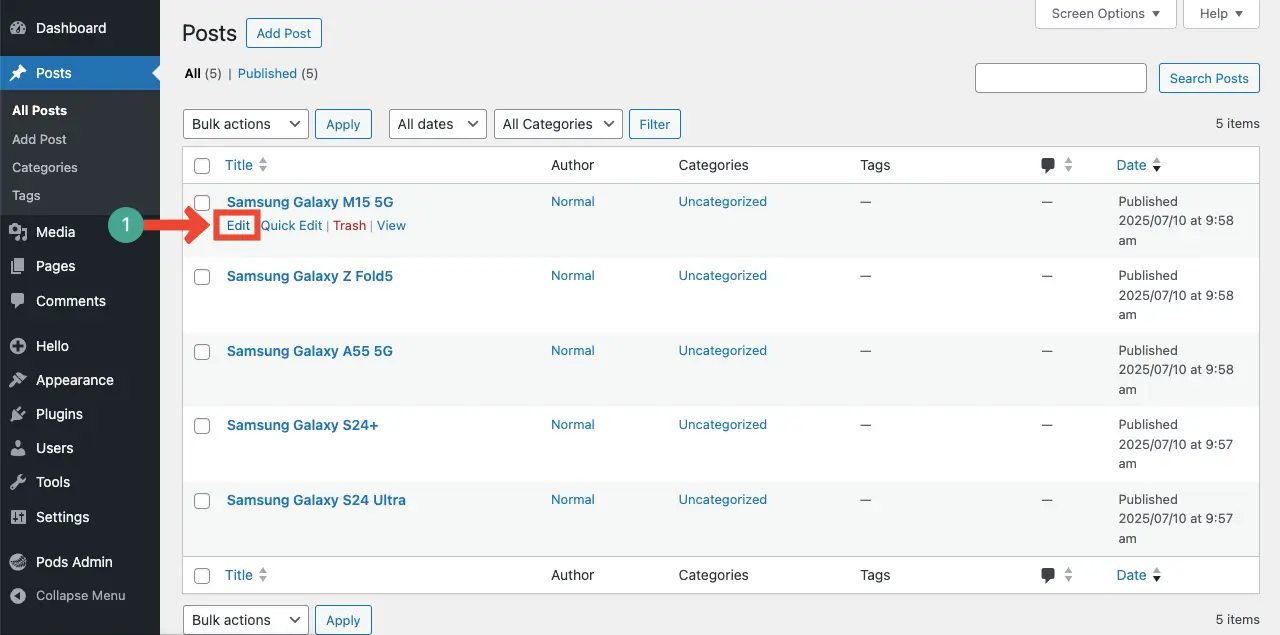
Then add the description in the block editor.
Step 3: Create a Custom Post Type and Add Custom Fields
Now it’s time to create custom fields using the Pods Admin plugin.
From your dashboard, go to Pods Admin > Add New. Choose Add Fields to Existing Content Type and select Posts.
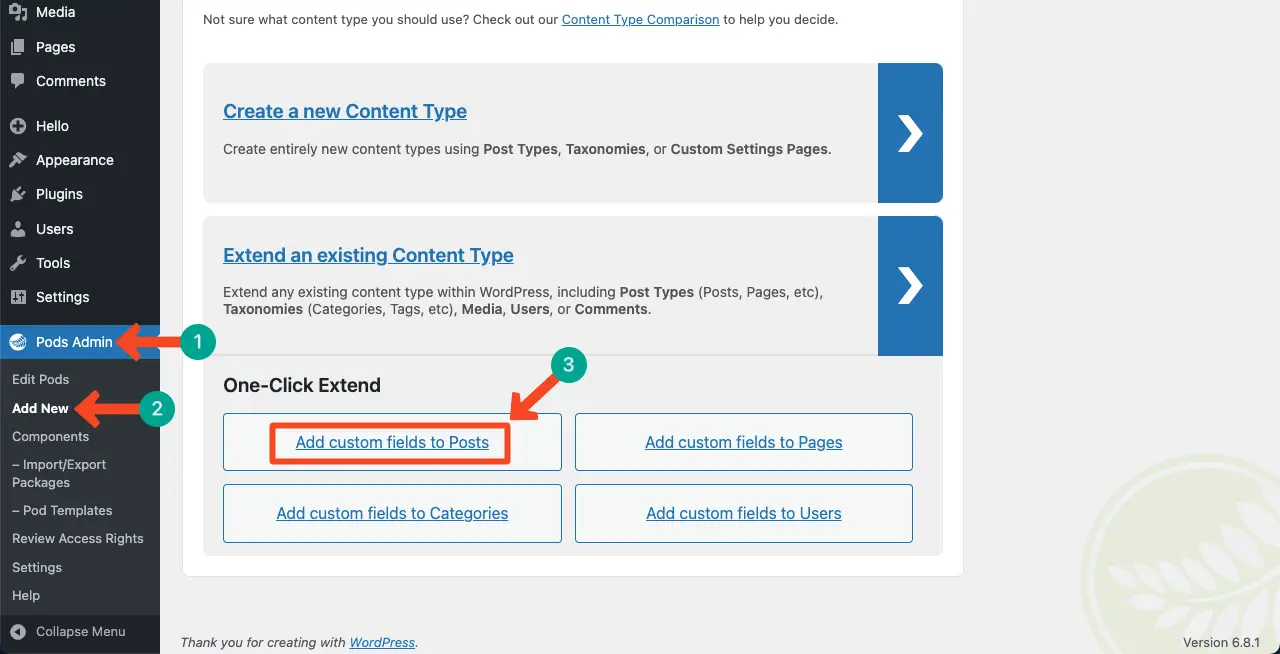
Click Add Field to start adding custom fields.
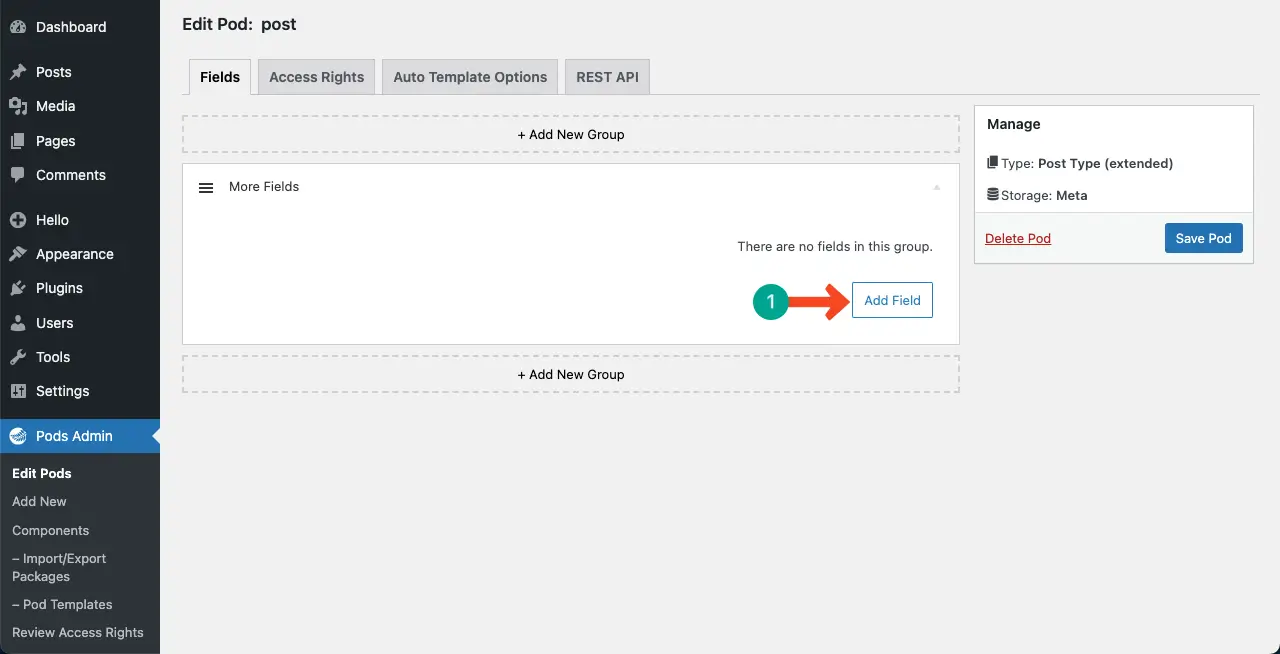
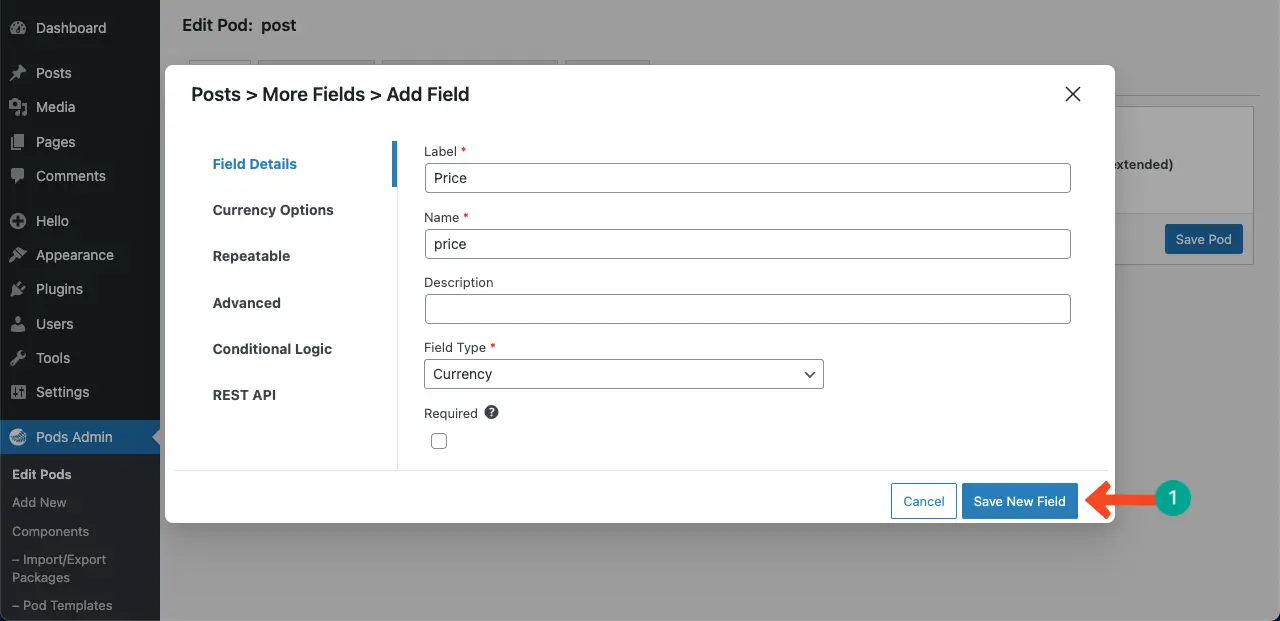
A pop-up will show up. You’ll get options to label the field, set a conditional logic, and many other things for it. Do the necessary changes and save them as required.
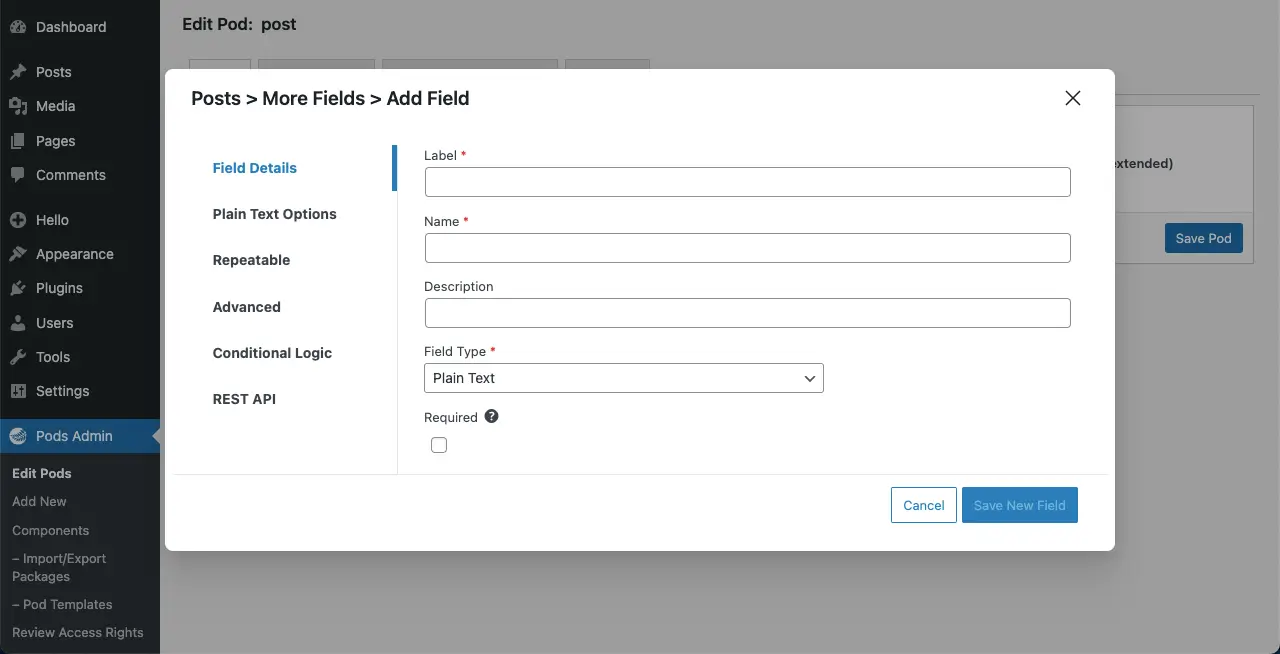
You can see that we have already labeled the new custom field. The boxes marked with a red-colored star (*) are mandatory to fill. The rest are optional.
Once done, save all the changes by clicking the Save New Field button.
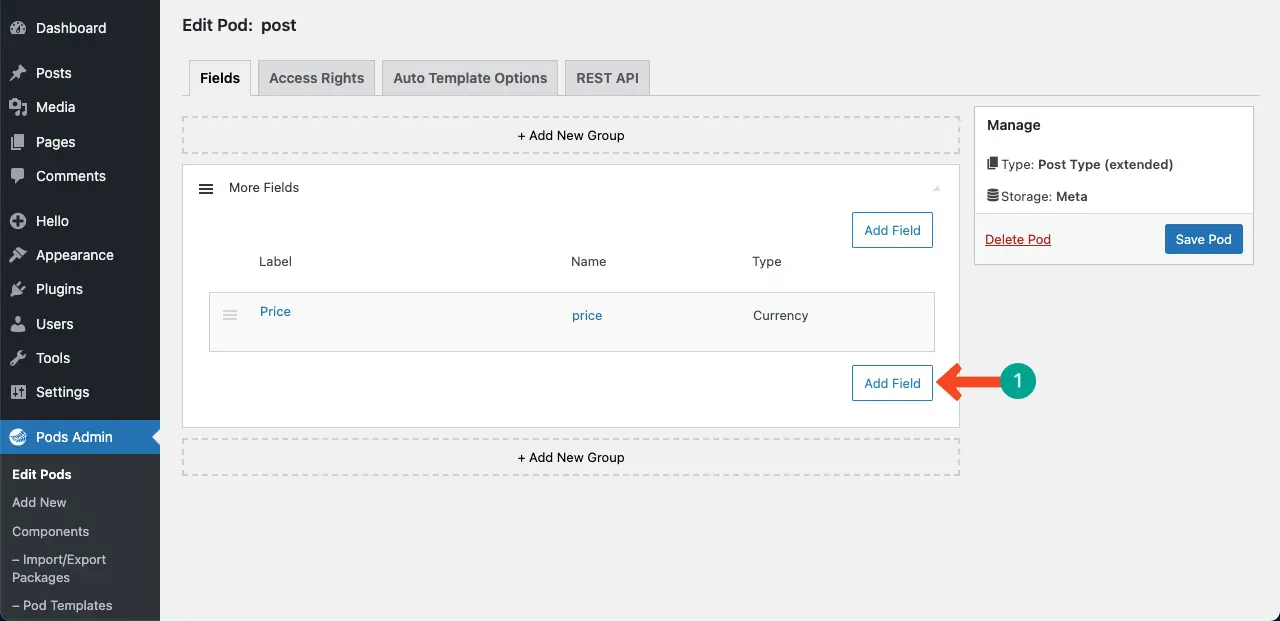
In the same way, you can create more custom fields as many as you want. Just click the Add Field button.
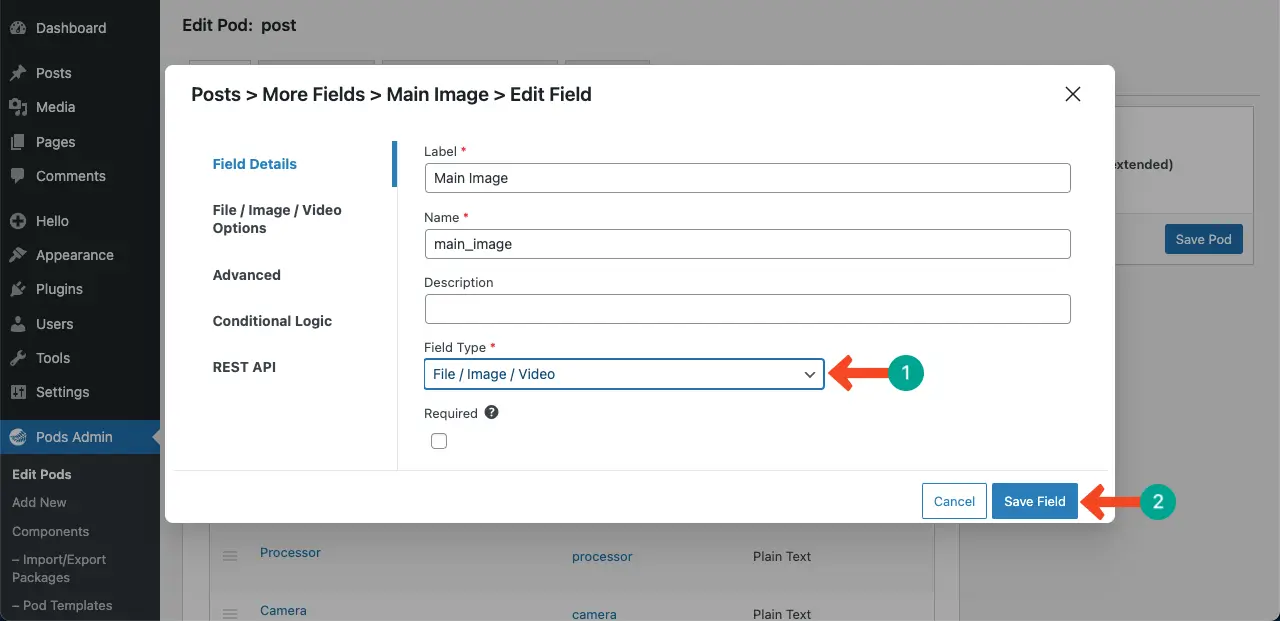
One important point to mention is that while creating a new custom field, make sure to select the suitable field type as well from the dropdown list marked in the image below. After that, save the changes.
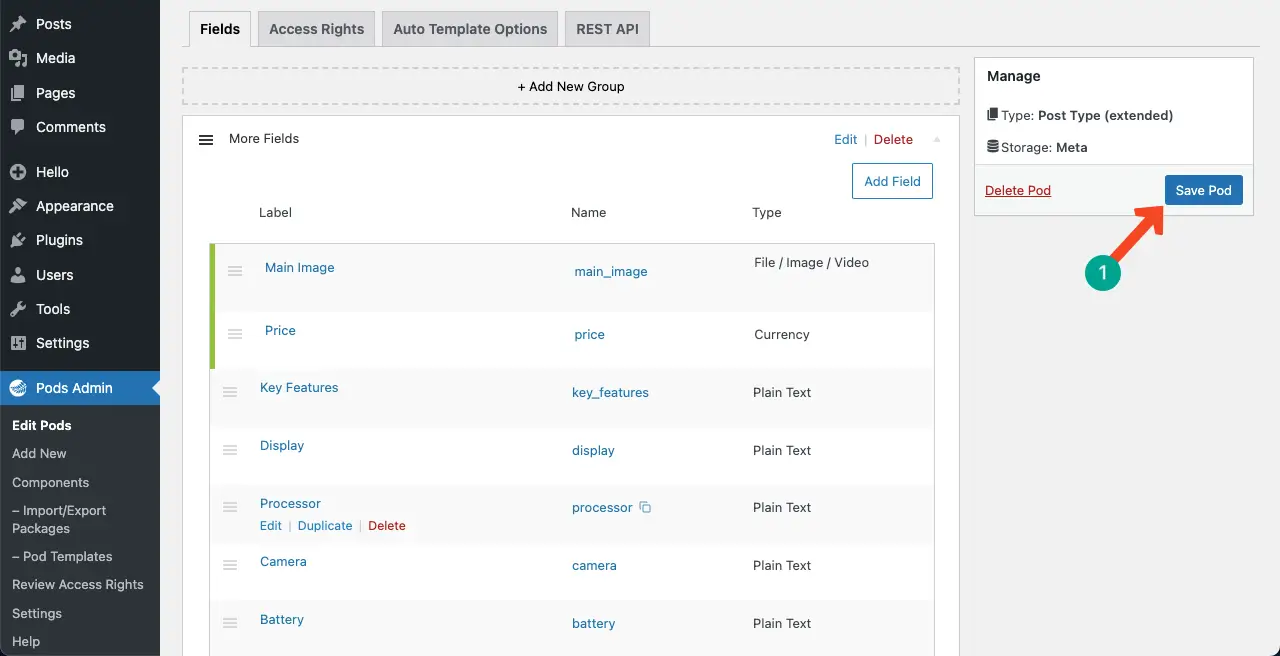
You can see that we have created the necessary custom fields we need. Now, click the Save Pod button to save all the fields.
Learn how to design a great Halloween web page.
Step 04: Fill in Information in the Custom Fields You Have Just Created
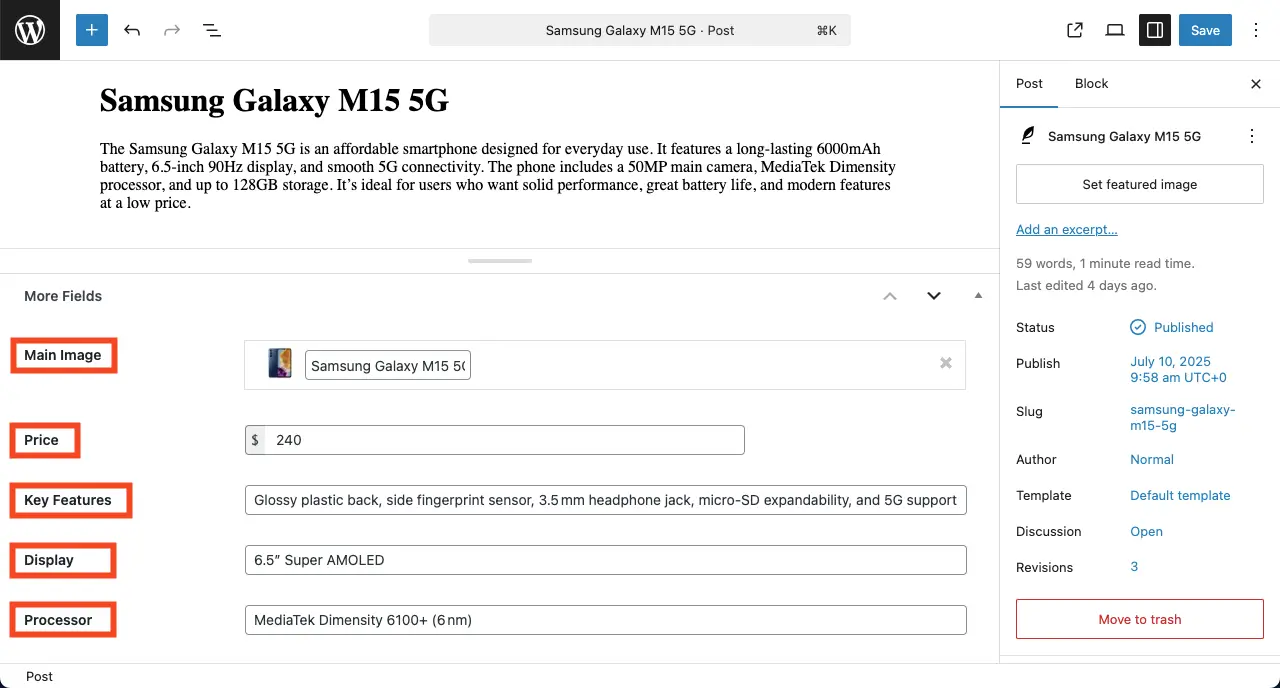
Open your posts one by one. You’ll see all the custom fields you have just created below the main post content, as shown in the video attached below. Fill in the necessary information in those fields.
Take a look at the image below, in which we have filled in the custom fields. Do the same for all the other posts you have created and where you want to.
When all the posts are ready, it’s time to design your dynamic web page. We’ll explain the process in the next phase.
Phase Two: Design and Create a Dynamic Web Page with Elementor
In this section, we’ll help you learn how to design and create a dynamic web page with Elementor and HappyAddons. Let’s explore the process below.
Step 01: Select Single Post from Elementor Theme Builder
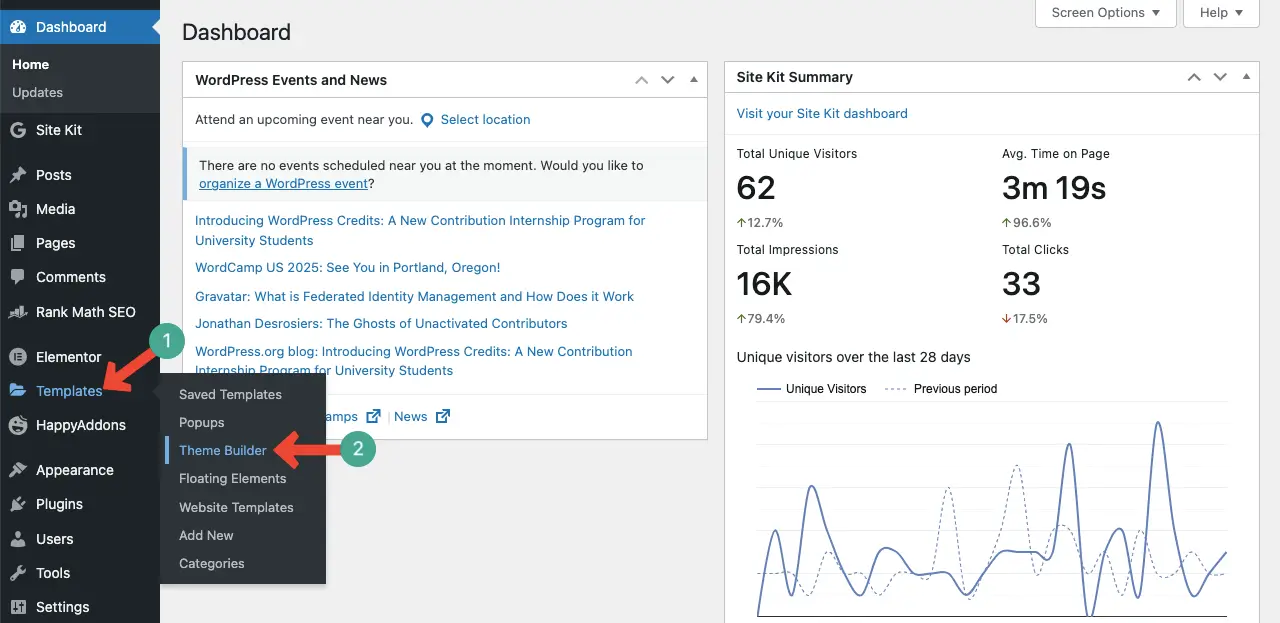
From the WordPress Dashboard, navigate to Templates > Theme Builder.
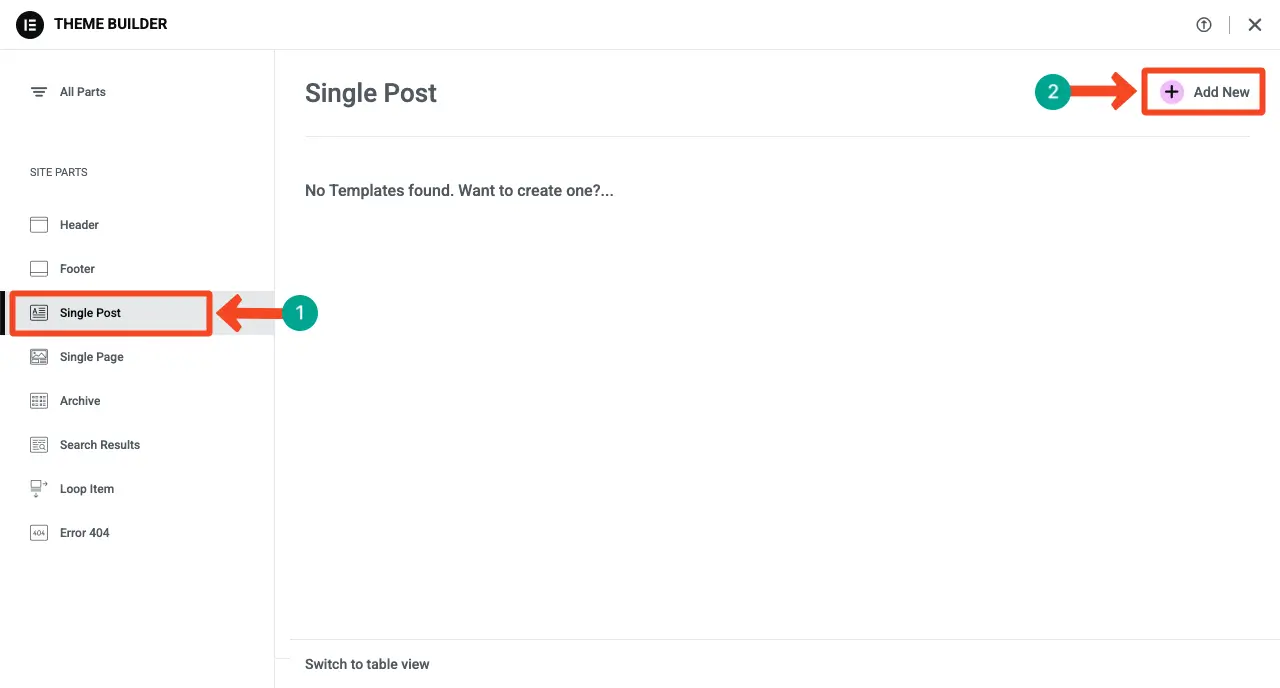
You’ll come to a new page. From here, choose the Single Post option and then click the + Add New button.
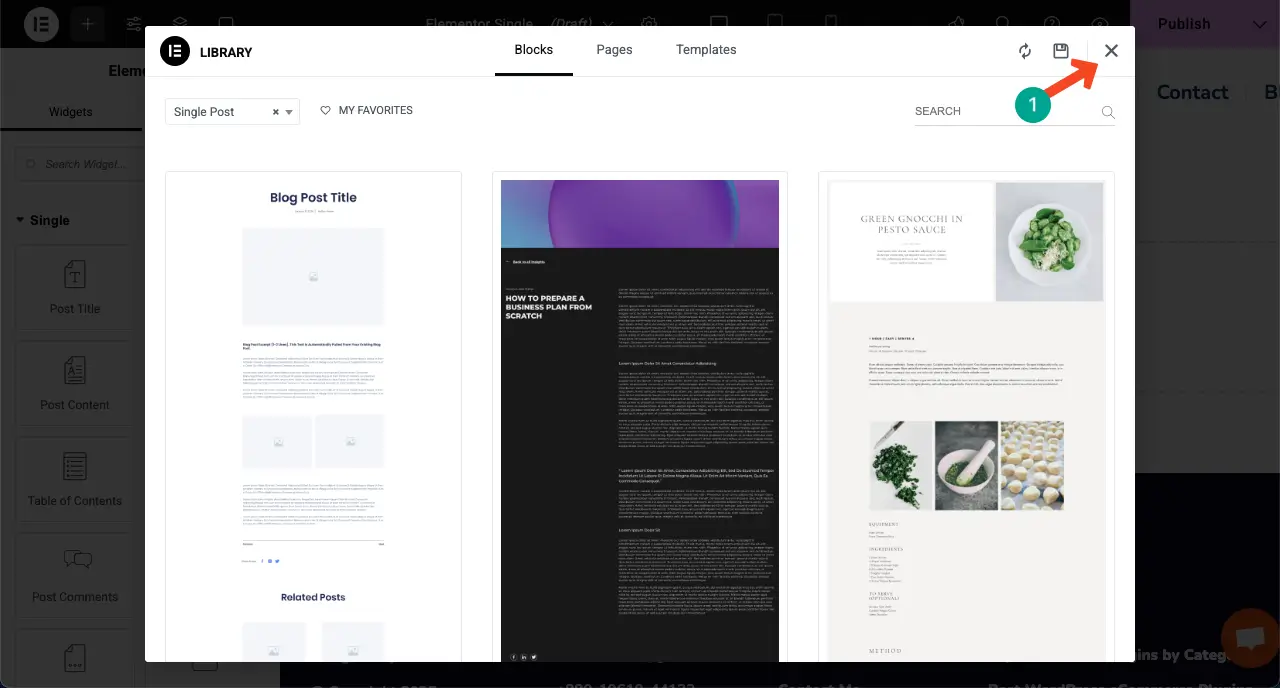
The Elementor Canvas will be opened right away. You may select a template or design the page from scratch. To design the page from scratch, close the popup of the template library.
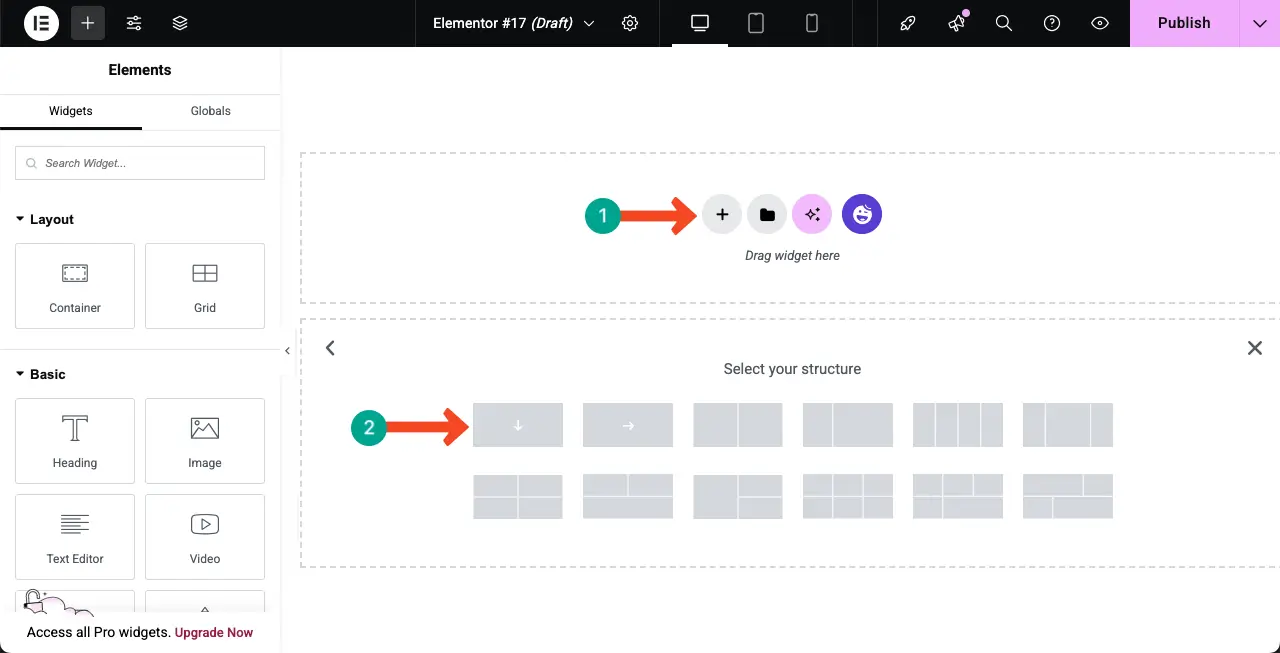
Step 02: Create a Column Layout for the Dynamic Page Design
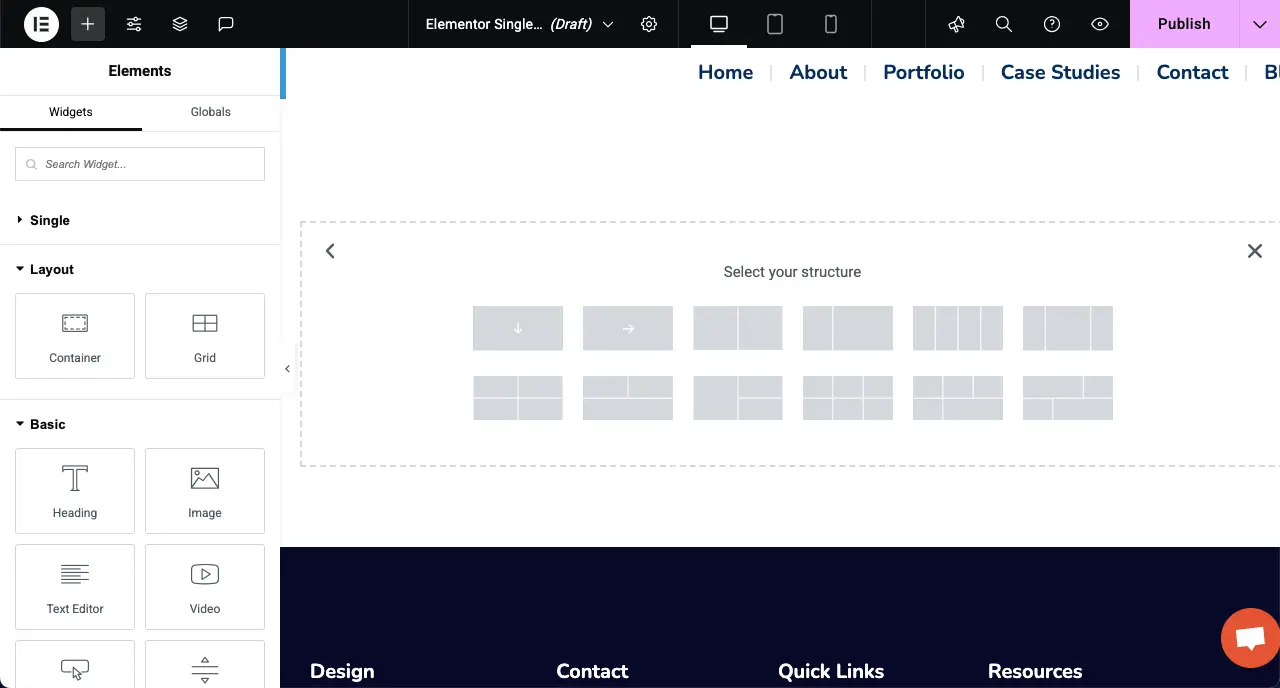
Now, to create a container layout, select a suitable column structure you want. For this tutorial, we’ll select the three-column container.
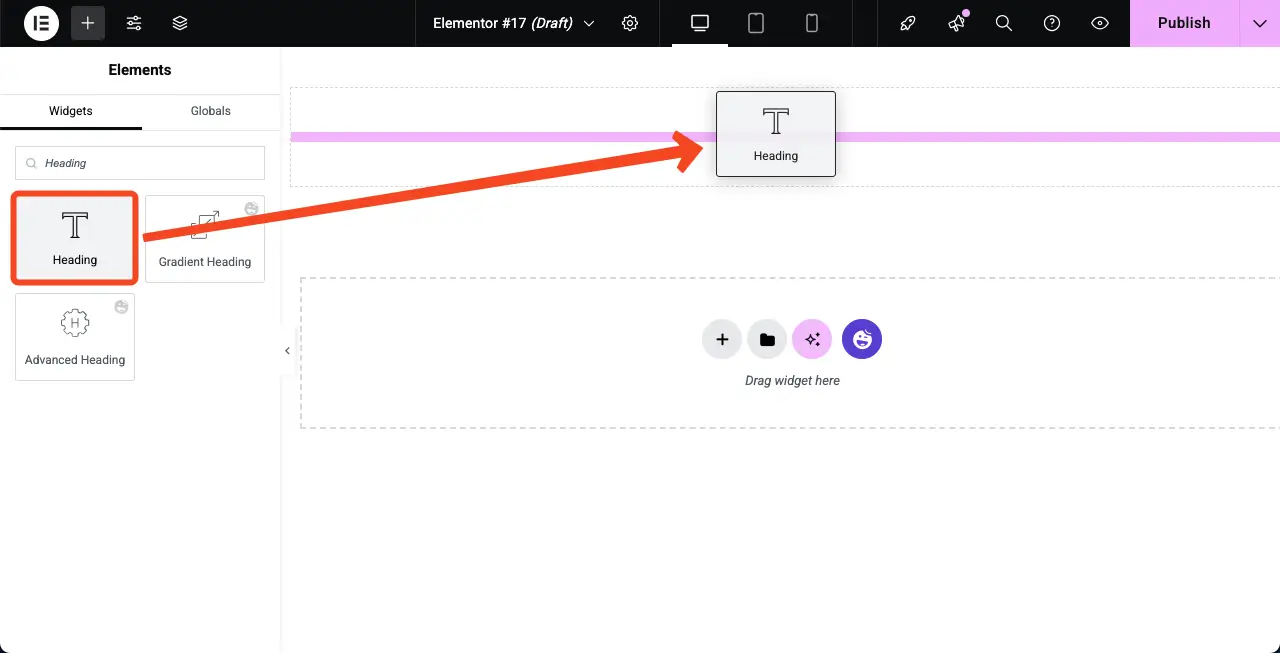
Step 03: Drag and Drop Necessary Widgets to Design the Page
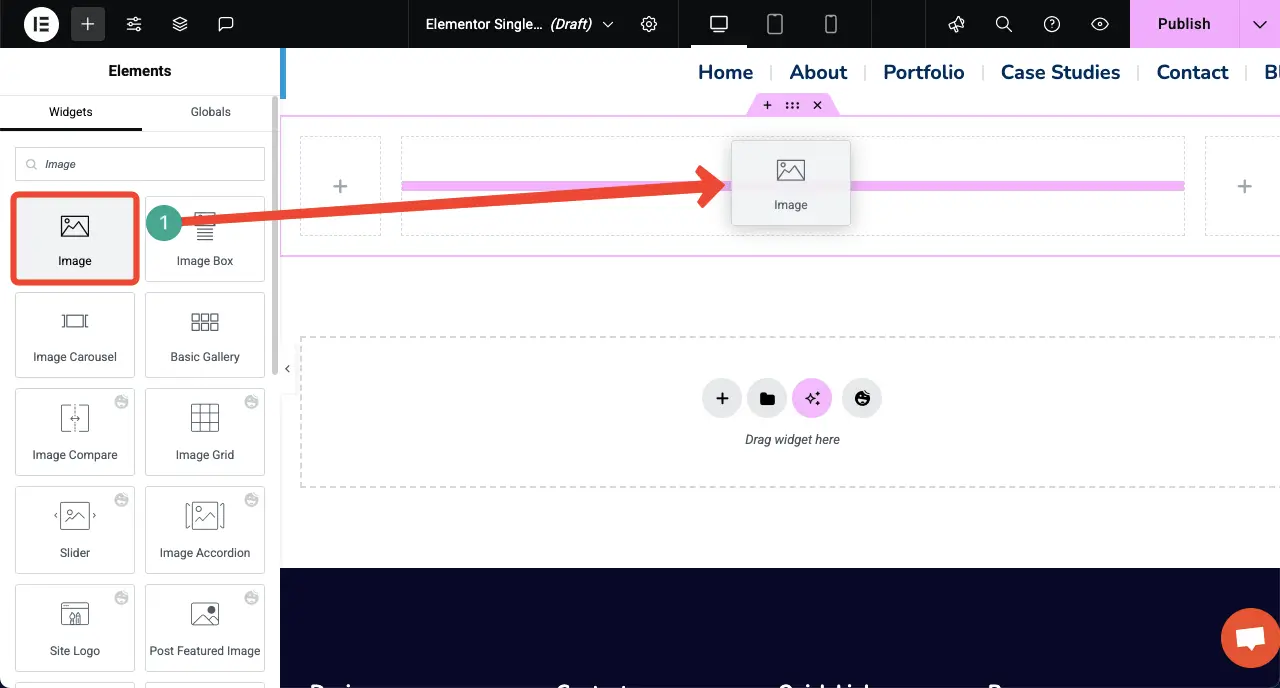
Now, drag and drop the widgets you need to design the page in accordance with the custom fields so you can present the necessary information. Let’s first drag and drop the Image widget.
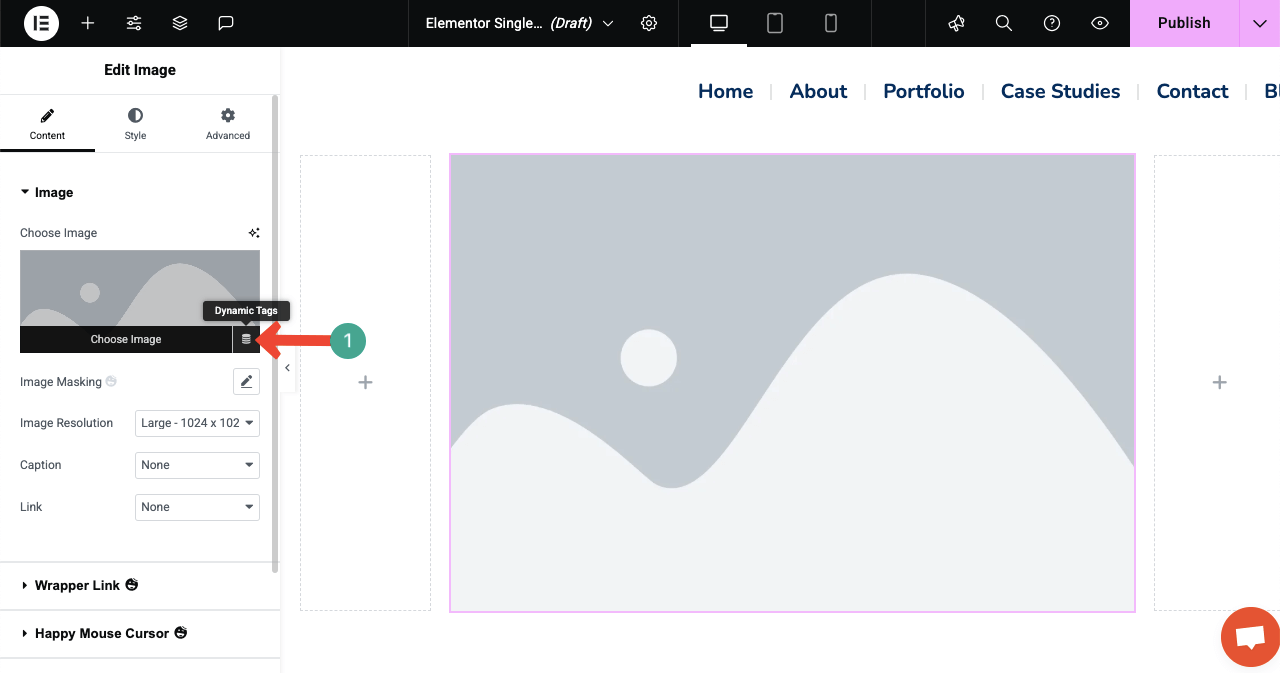
On the right sidebar, under the Image section, you’ll see the Dynamic Tags option as shown in the image below. Click the Dynamic Tags.
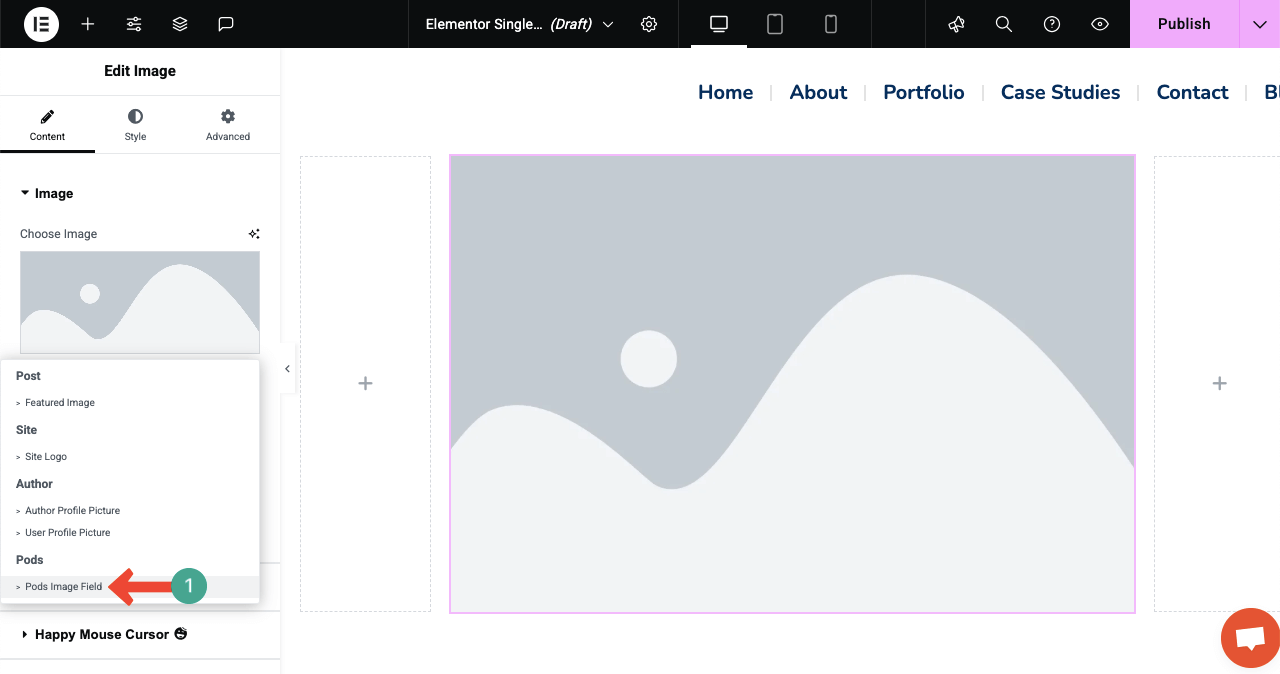
After the Dynamic Tags are clicked, a tag list will appear. From there, select the Pods Image Field tag.
After that, a new dropdown list option will appear next to Key. Click the list icon.
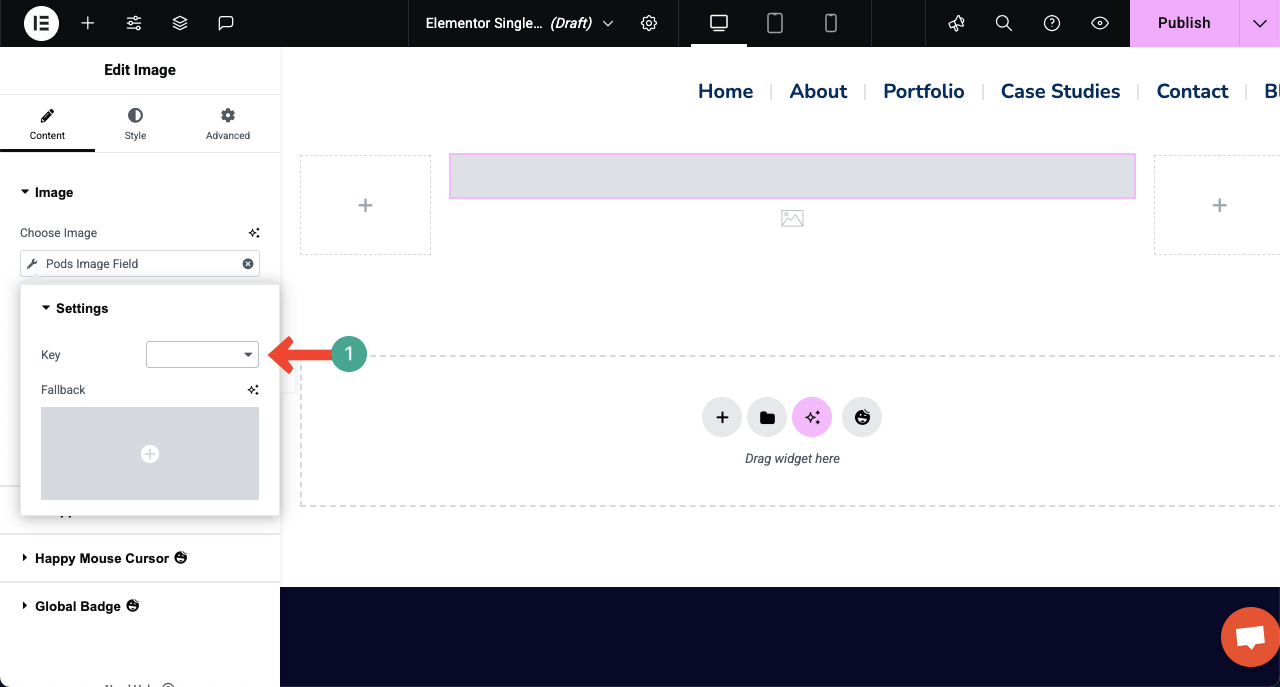
Select the respective name you used for labeling the custom image field.
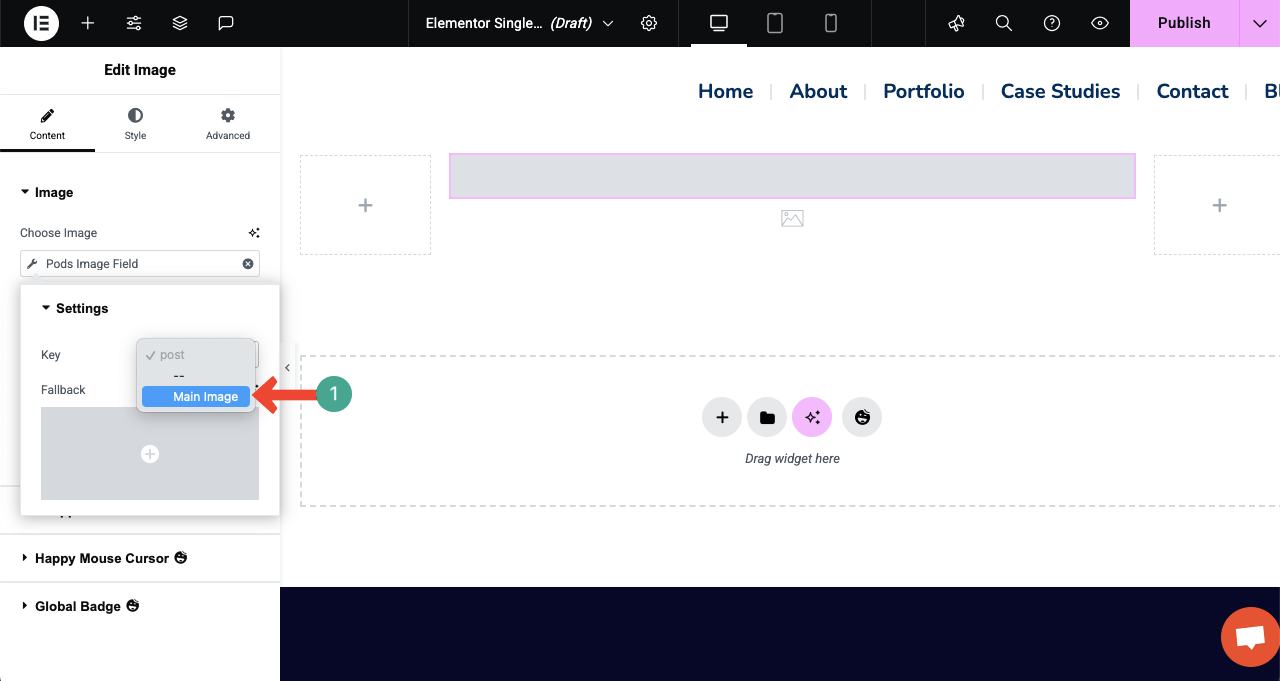
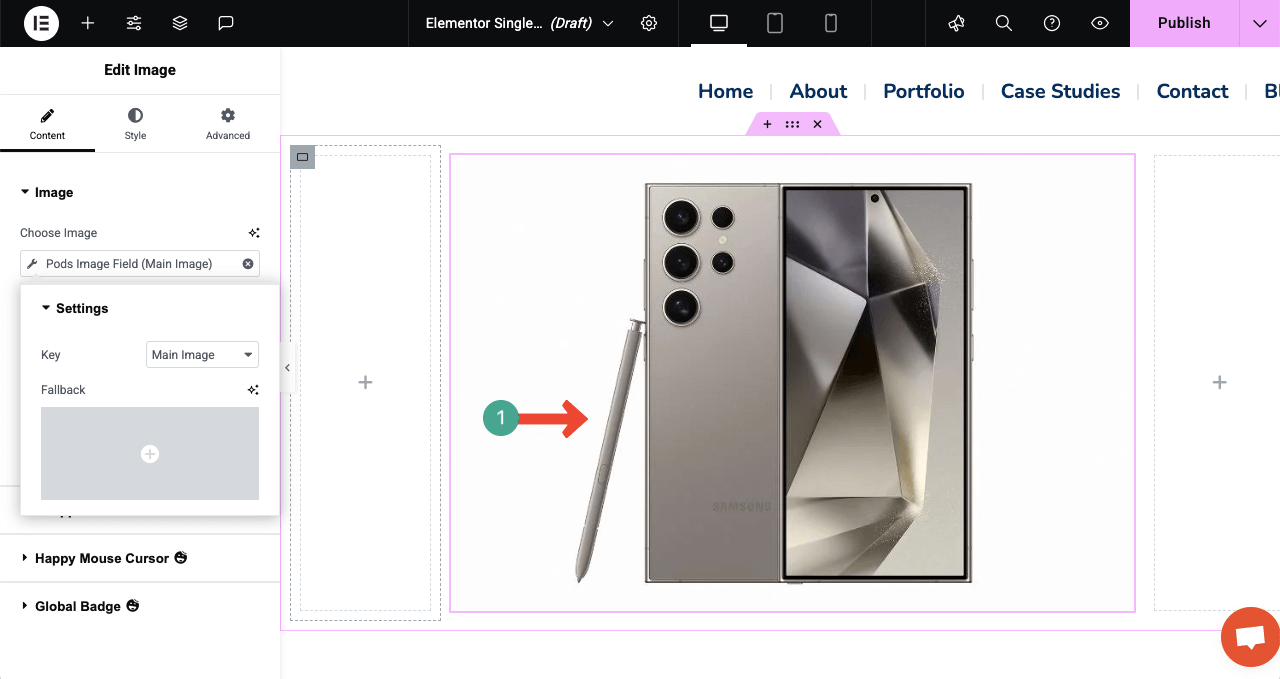
You’ll see the image displayed instantly.
Step 04: Keep Adding Other Widgets to Display All Information
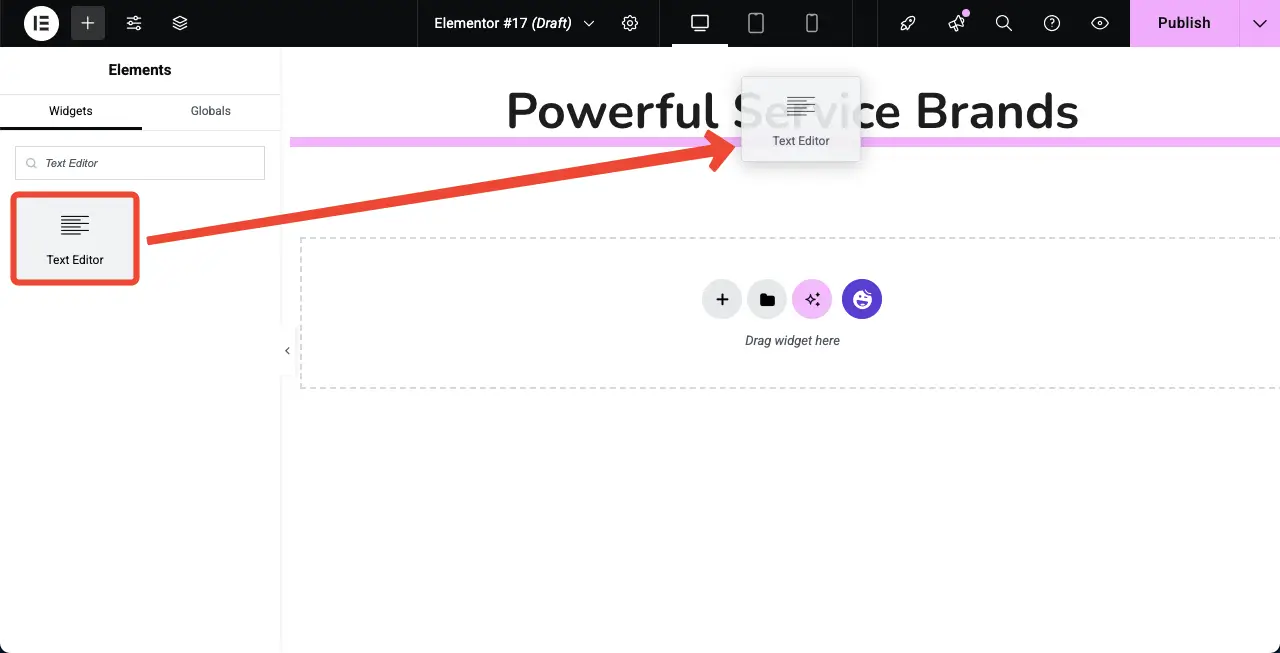
In the same way, keep adding other widgets and display information from custom fields by setting respective dynamic tags. For example, drag and drop the Heading widget below the image on the canvas.
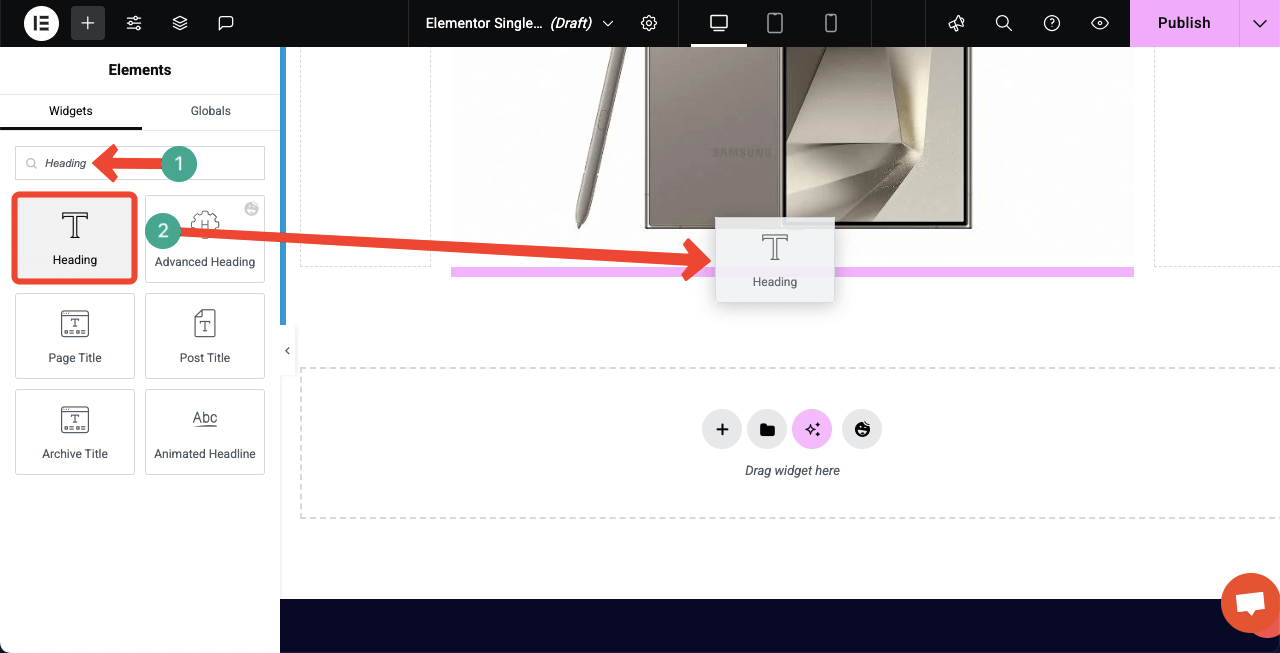
Click the Dynamic Tags option from the title section of the widget.
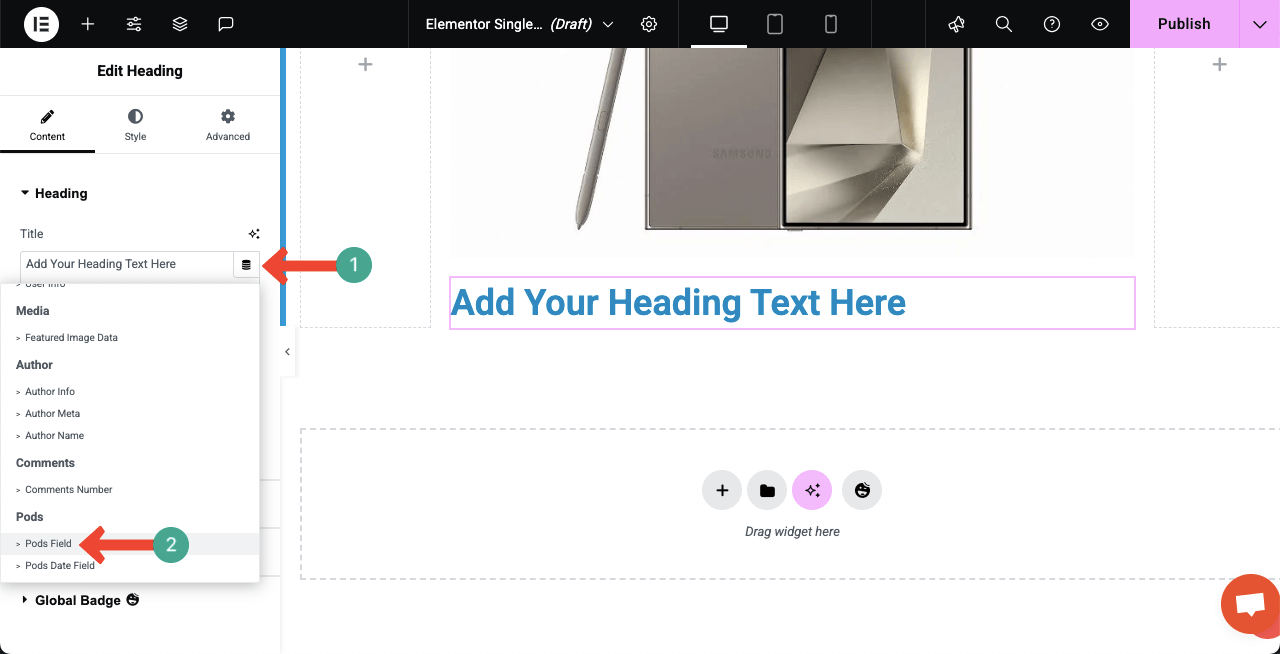
A small popup will show up for configuring Settings. Click the box next to Key. Click the Key box.
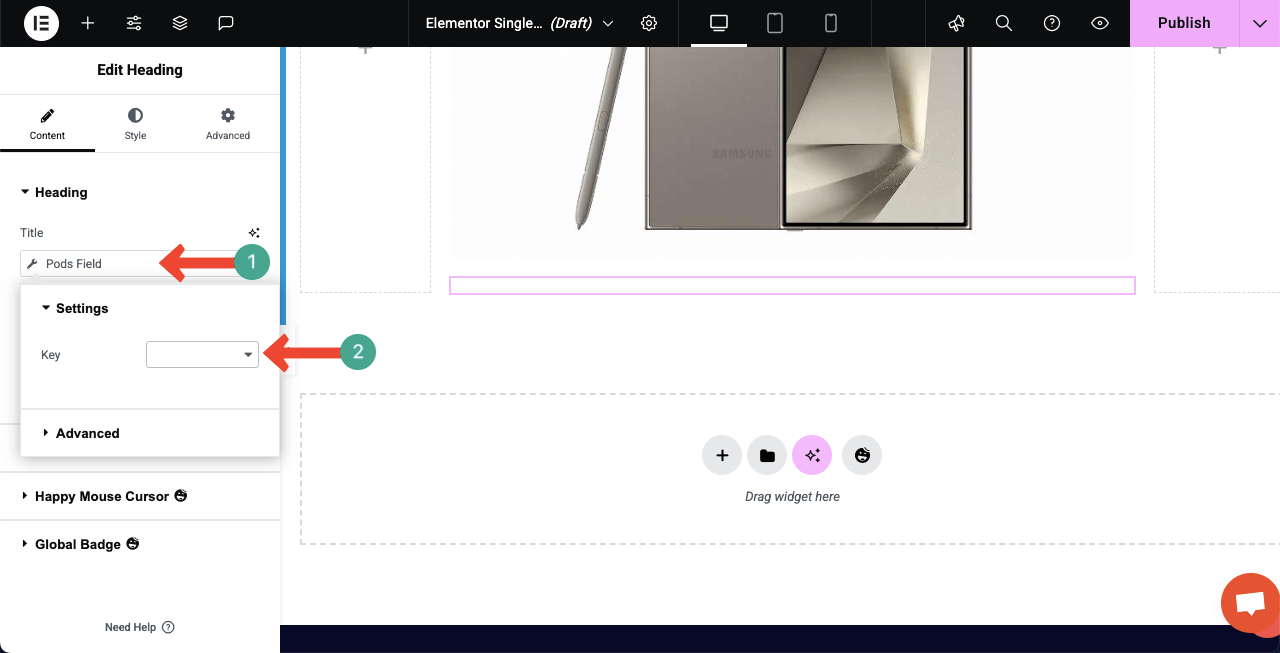
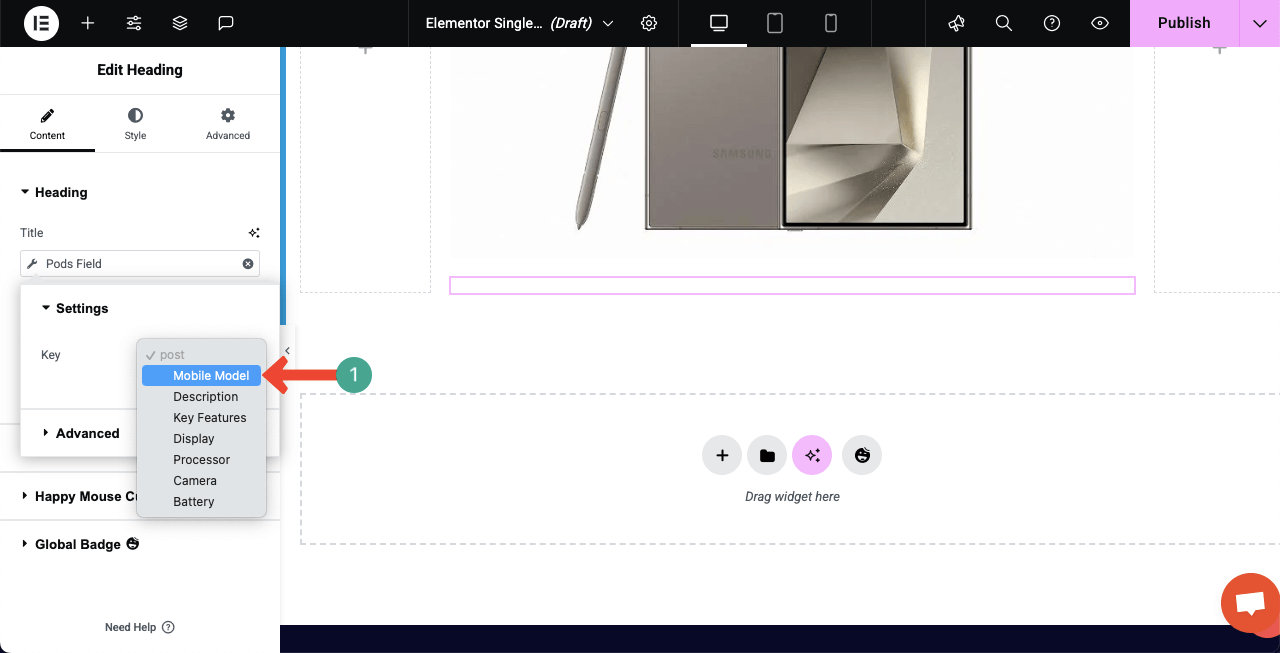
Select the respective custom field for the widget that suits the heading widget.
You can see that the custom field has been selected for the widget. Instantly, you’ll see the product name appear on the canvas.
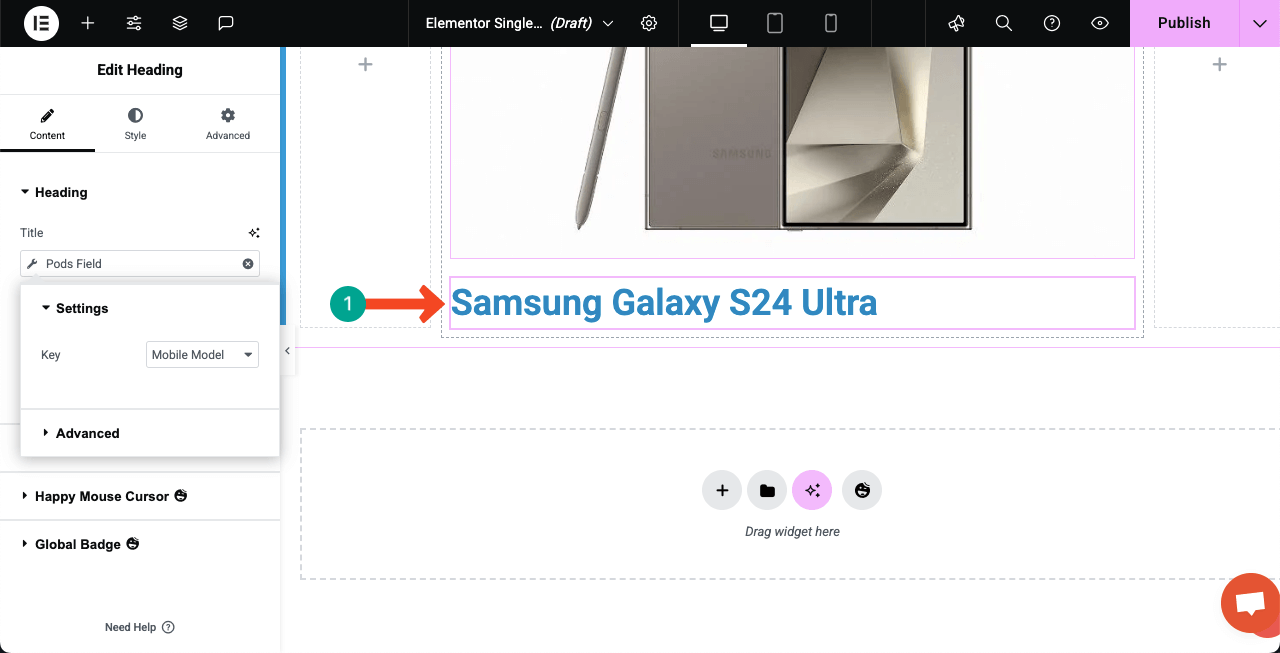
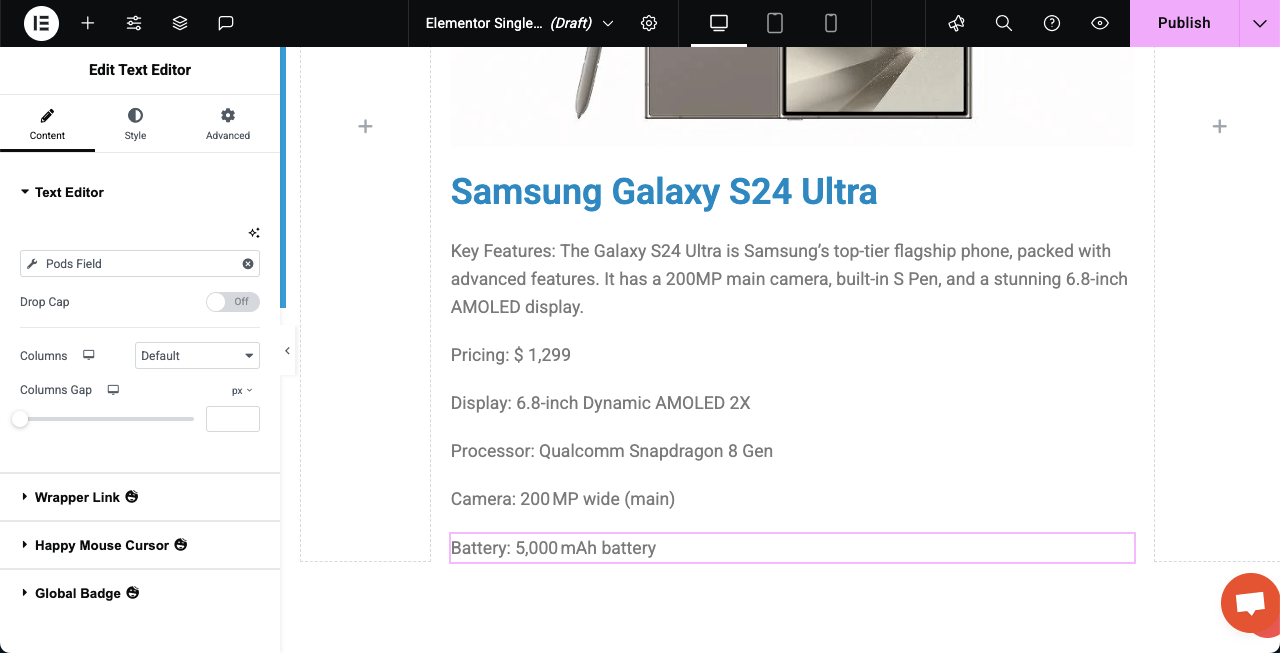
Note: In the same way, we have added all the custom fields to the page through tags.
Here’s a tutorial on how to design a black friday and Cyber Monday landing page.
Step 05: Stylize the Dynamic Web Page
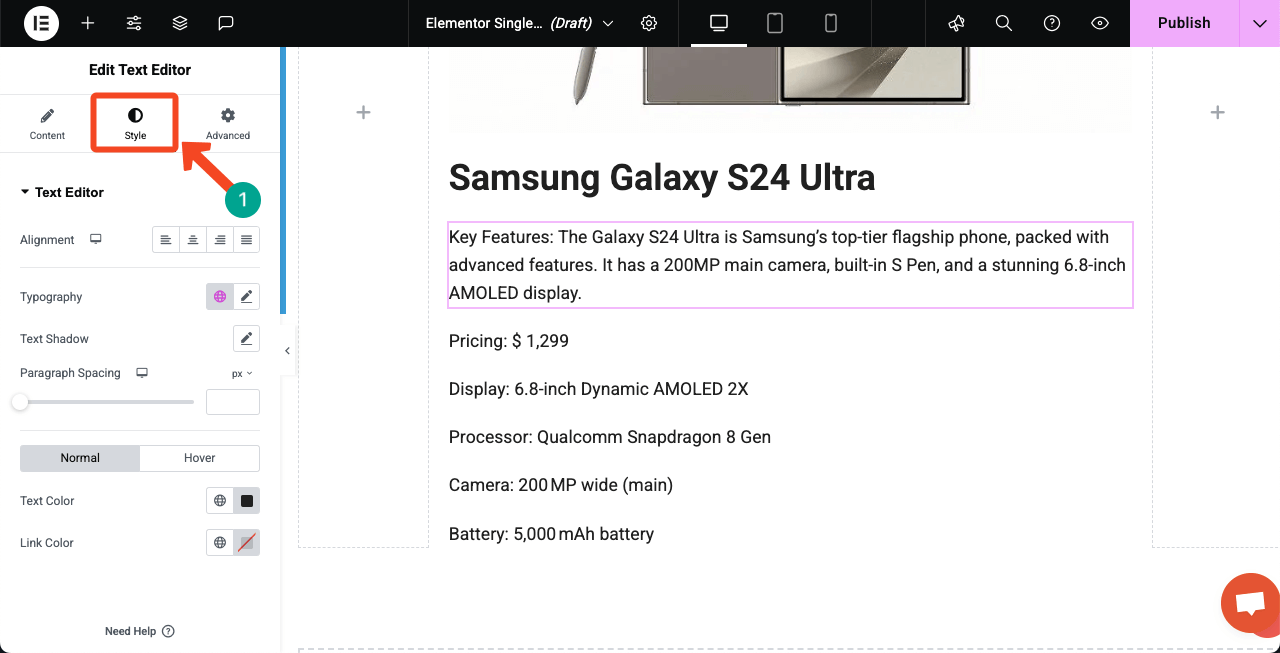
Go to the Style tab for each widget one by one and customize them so they look good according to your web page design.
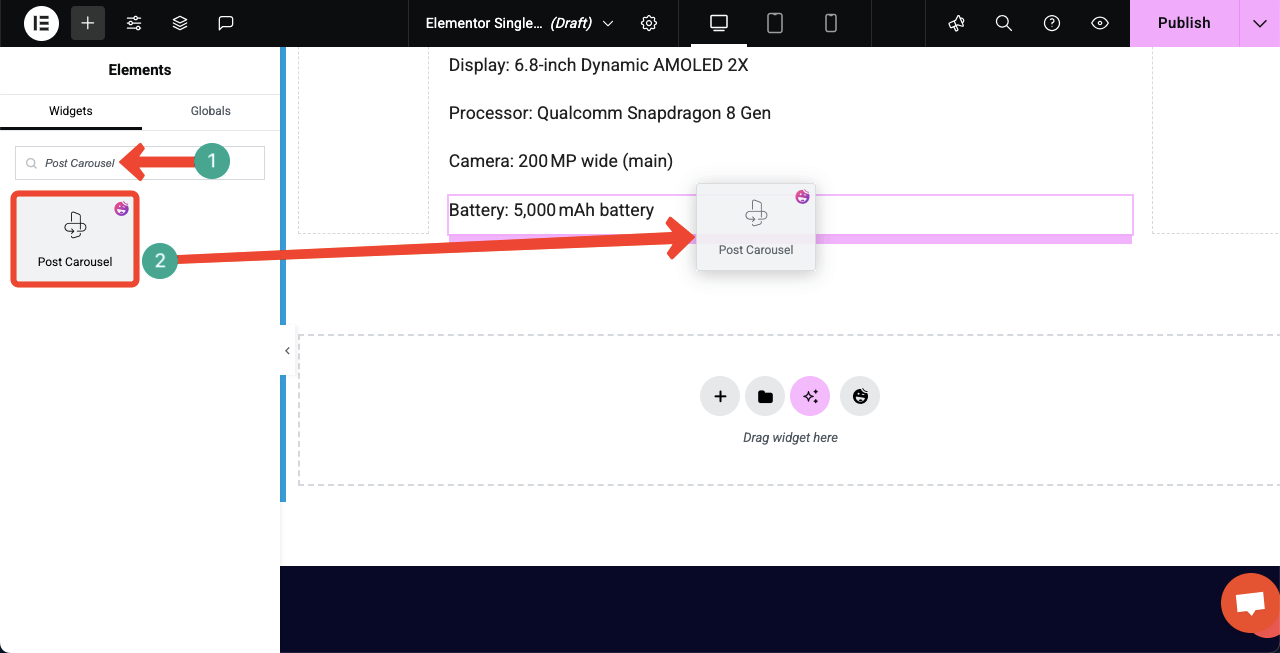
Step 06: Add the Post Carousel Widget to the Canvas (Optional)
Using the Post Carousel widget, you can showcase the related or latest posts, which can add a better experience for users.
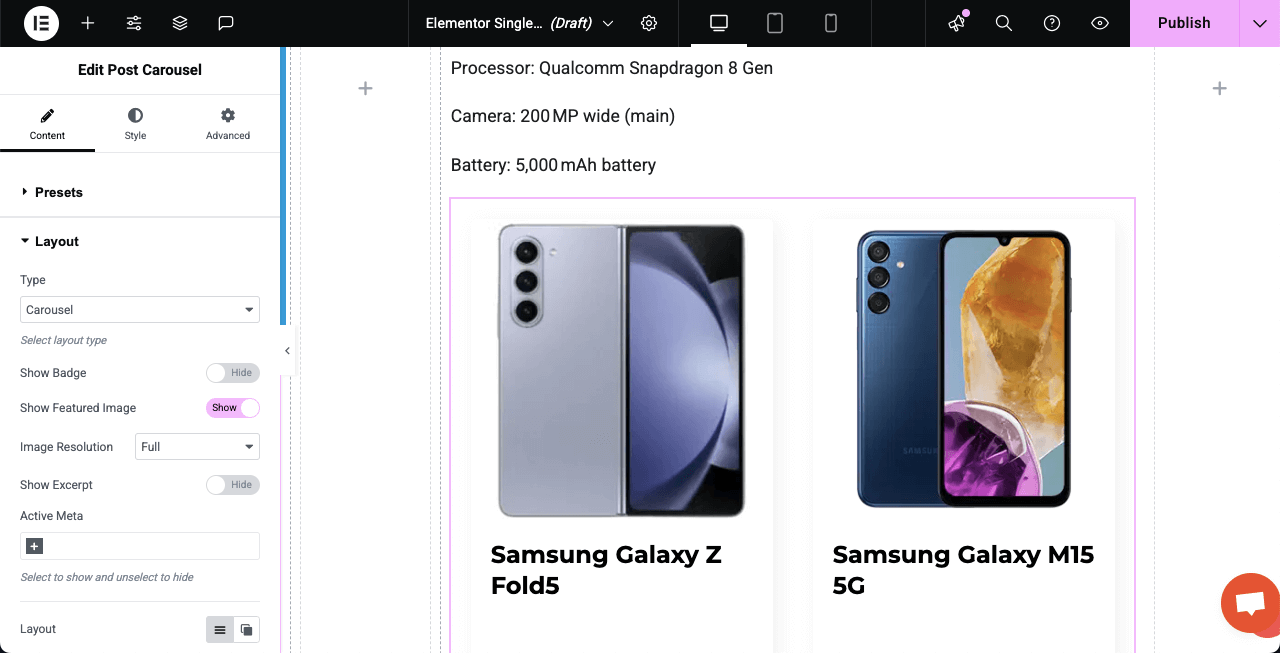
You can see that we have added the post carousel widget, which is displaying some other mobile models.
Step 07: Make the Page Mobile Responsive
You’ll find options to adjust the page layout for different screen sizes on the top bar. Make sure to optimize your layout separately for each screen size.
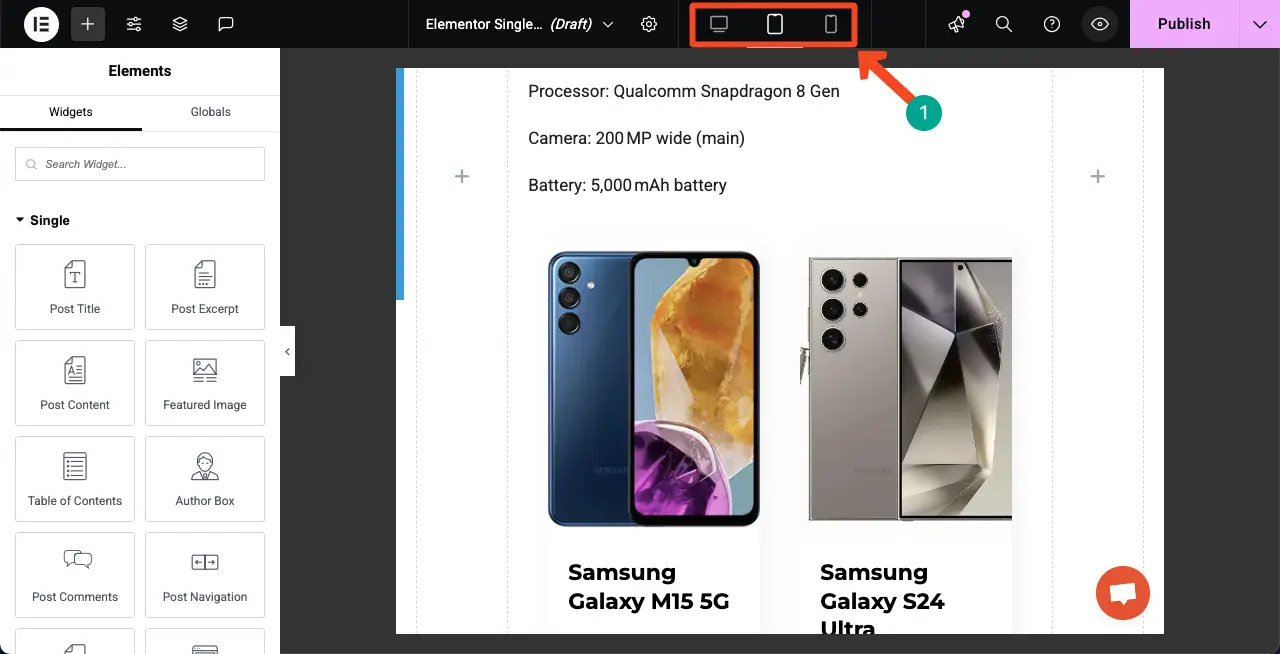
Step 08: Publish the Dynamic Page and Set Condition
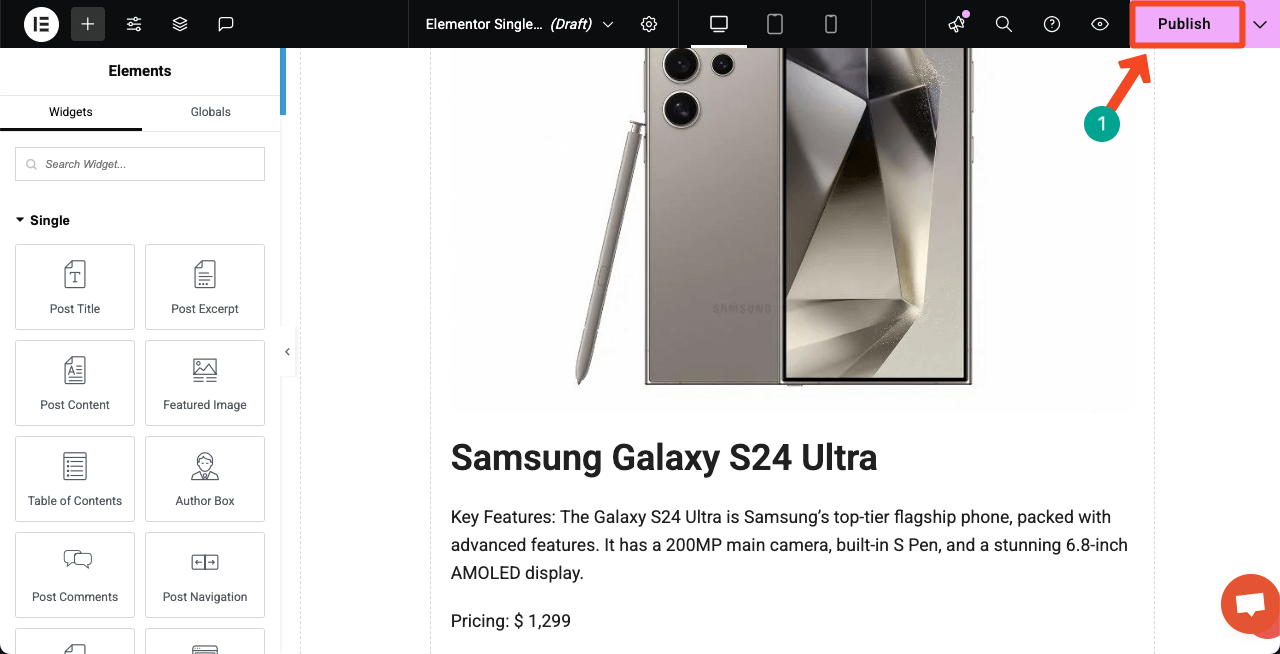
When the design is done, click the Publish button in the top-right corner.
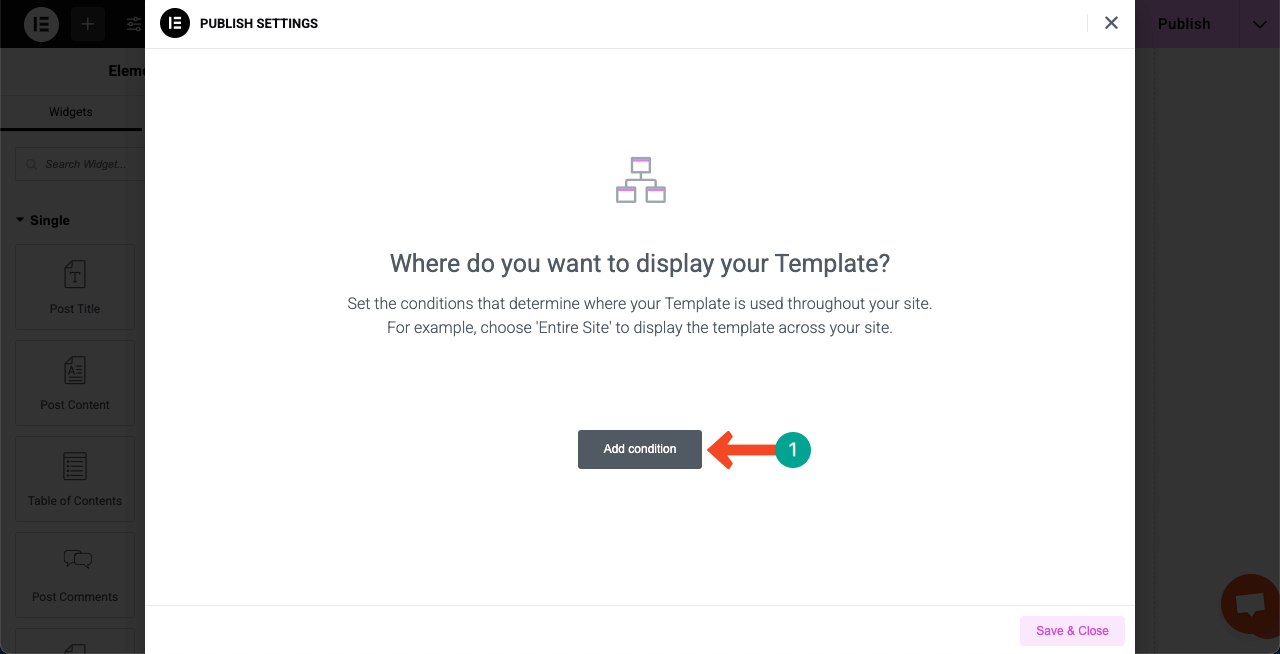
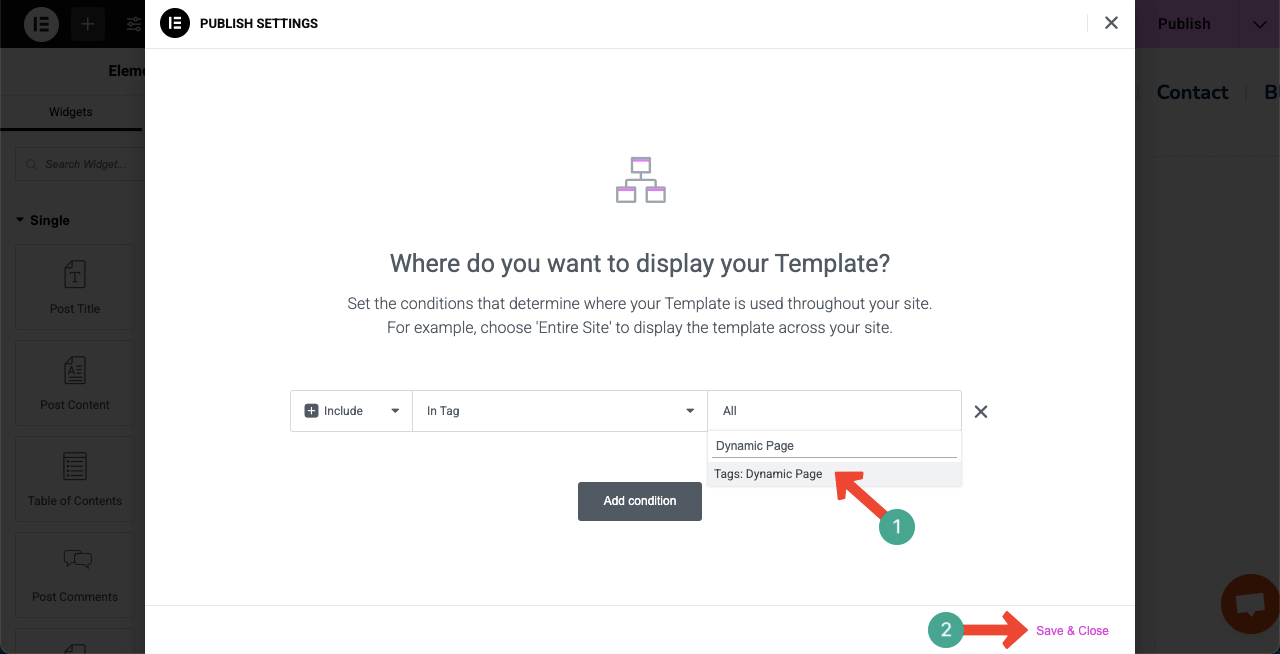
You’ll be asked to set conditions for the page. Click the button Add condition.
Since the dynamic posts will be displayed on a specific page, it’s better to set a particular tag or category for the posts. For our page, we set a tag for the respective posts. So, we are selecting the ‘In Tag’ option.
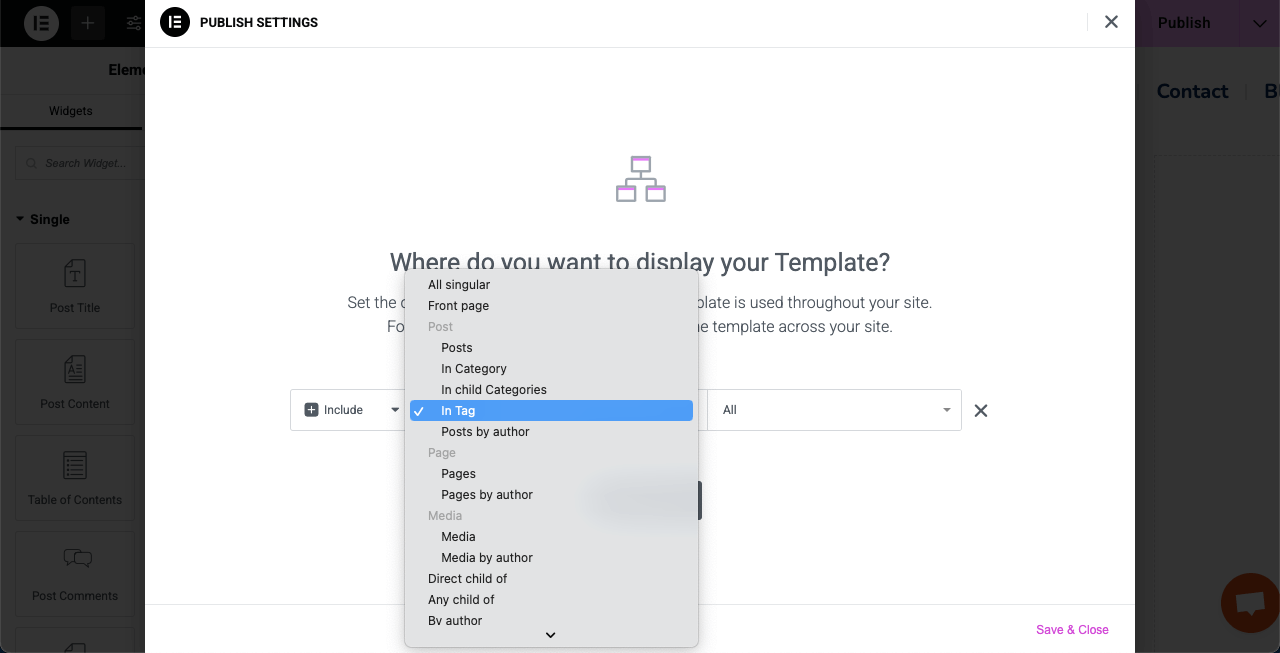
Type your tag or category name for the page. Then, hit the Save & Close button.
Step 09: Preview the Dynamic Page
Now, go to the preview page and check if the page works or not. You may click on multiple posts to check if they are opened up with the same custom post layout. You can see that it’s working well on our end in the video clip attached below.
Thus, you can create dynamic web pages in WordPress using the Elementor plugin.
Checklist You Must Keep in Mind When Creating a Dynamic Web Page
So far, you have learnt how to create a dynamic web page in WordPress using Elementor. Hope you have enjoyed it. But to get the most out of dynamic page creation, there are several points you must consider carefully, which we have listed below as a checklist.
a. Use Dynamic Tags Properly
Make sure you are using dynamic tags in the right places. Elementor allows you to pull content from custom fields, posts, users, site data, etc. Never can you create wonderful, dynamic pages without being able to use tags properly.
b. Set Conditions for Display
When using Elementor Theme Builder, whether it’s a single post, archive, or product page, always set the right display conditions. Otherwise, the dynamic web page will fail to pull and display the custom posts.
c. Optimize for Speed and SEO
Dynamic pages often pull data from the database. So, use a caching plugin and image optimizer to keep the page fast. Also, make sure you are using proper heading tags (H1, H2, etc.), alt text for images, and meta descriptions to improve SEO.
d. Maintain Design Consistency
Use Elementor’s global fonts, colors, and spacing to keep your design consistent across all dynamic pages. Consistent design looks more professional and builds user trust.
e. Enable Safe Mode for Troubleshooting
If anything breaks or acts weird, enable Elementor’s Safe Mode. It will let you edit the page without interference from other plugins or themes. This is helpful when working with complex dynamic content.
Closing Up!
Dynamic web pages are a smart idea to showcase information on a website in the most flexible formats. In this tutorial, we walked you through the process step by step and shared a detailed checklist to guide you. Also, we have introduced you to the tools by which you can design a dynamic web efficiently, without even a single line of coding.
All you can do is just drag & drop and value settings. Even a beginner can build dynamic web pages after exploring these tools for a few days. We believe learning by doing is the best way to grow. Now, if you still have any questions or confusion poking your mind, just drop a comment or knock on the live chat box.
Our team members will respond to your queries right away. Also, follow our Facebook, Twitter, and YouTube channels for regular updates.

